Supplement etracker tagging
There is a free video course about the etracker tag manager on our etracker e-learning platform, in which all the functions are presented in detail.
Go directly to the course here (German only):
https://academy.etracker.com/course/etracker-tag-manager
The etracker tag manager enables marketers to customize the tracking for the website in such a way that an even more detailed analysis is possible. This is also possible without programming knowledge and access to the website code.
Furthermore, third-party tags can be easily configured and activated.
Debug mode can be used to check the integration of tags without distorting the analysis data.
The tag manager can be accessed via the main menu. The following etracker tags are available to conveniently and flexibly enrich data collection with etracker analytics:
The general etracker tags include:
- etracker Event: The CSS selector can be used to measure the click on a specific element on a page or when it enters the visible area.
- etracker onsite campaign: If the success of website functions, such as a click on a specific teaser or similar, is to be measured, interaction with elements of the website can be recorded in the same way as events using CSS selectors. Conversions, i.e. leads, orders etc. generated after the click, can be evaluated automatically.
- etracker dimension: When an interaction is recorded, a suitable user segment dimension can be filled in to define different user groups.
- etracker Conversion: If a page view or event (micro or macro) is a target of the website, the conversion action can be selected from the recorded pages or using a CSS selector.
- etracker Onsite Search: The search queries of your own website search can be analyzed in order to increase the performance of the website.
- Wrapper: The wrapper tag makes it possible to measure so-called virtual page views if the URL does not change, or if only the associated URL parameters change.
The e-commerce etracker tags include:
- Product seen: When a product detail page is displayed.
- Added to shopping cart: When a product is added to the shopping cart.
- Order: When an order is executed or sent.
How to configure etracker tags
The definition of a tag includes:
- Type of tag: Determines what is to be measured, e.g. a website event, a conversion, etc.
- Trigger selection: The trigger defines which event triggers the measurement, such as a specific interaction with the website.
- Definition of variables: Variables can optionally be used to dynamically assign meta information to the event. Otherwise, these are either permanently assigned or read from the respective element.
E-commerce etracker tags can only access information via the data layer (variables). This is (besides plugins) the technically cleanest, most stable and most scalable solution. A complete, structured data layer (data layer) is a prerequisite.
Click on Add tag to activate recording and processing. Use the debug mode for checking.
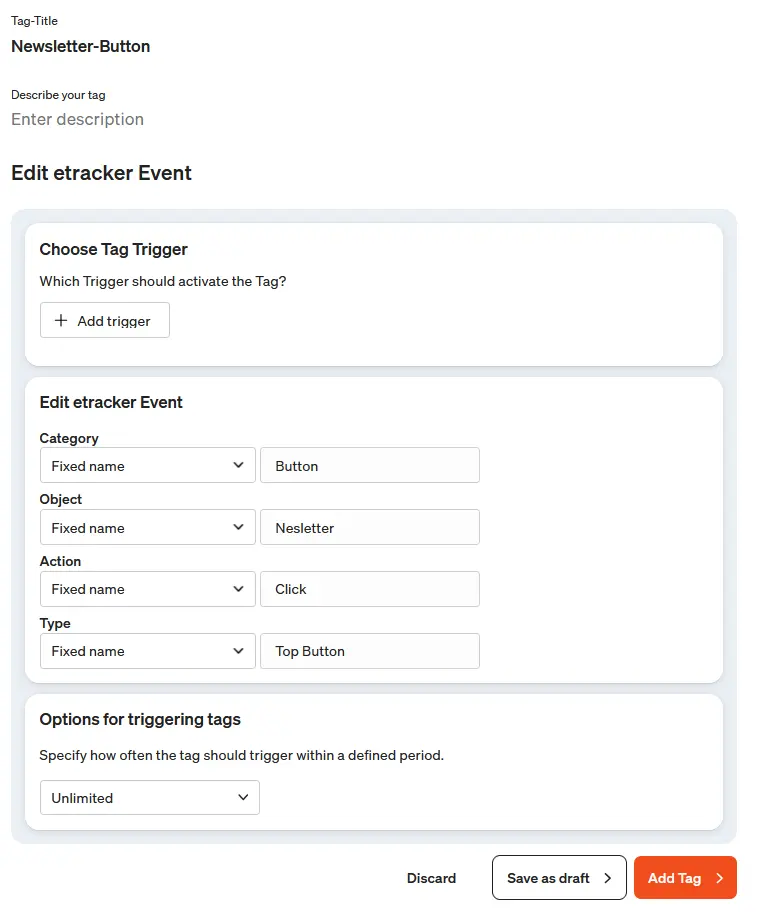
etracker Event
The etracker event tag is used to measure interactions with the website that do not consist of a page view and is to be understood as a supplement to the events of automatic recording, such as downloads or social media links.
Proceed as follows:
- Call up the tag manager menu item in etracker analytics.
- Click on + Add tag and select the etracker event type from the etracker tags.
- Select a triggerthat serves as a condition to trigger the tag. This could be, for example, a click on a specific element or scrolling to a specific section of the page.
- Now you can configure the values for the dimensions “Category”, “Object”, “Action” and “Type” so that they appear in the “Events” report.
You can either assign fixed values or variables use variables. Base this on existing values so that your reports remain clear and consistent.
The fields “Category” and “Object” must be set, “Action” and “Type” can remain empty. - In the last step, you can define the frequency of the playout.
Unlimited: Every time the trigger condition is met.
Once per page view: The tag is only played once per page view, even if the trigger is triggered several times. If the page is reloaded with a reload or is called up again after visiting another page, the triggers are triggered again.
Once per trigger (session): If there are several triggers that trigger the same tag (or link), the tag is played several times. However, only once per trigger. If a new session begins, the same trigger can trigger the tag again. - Enter a name at the top under Tag title and optionally a description that explains in more detail what the tag does.
- The tag is published directly with Add tag. You can also save the tag as a draft and test it in debug mode before publishing it.
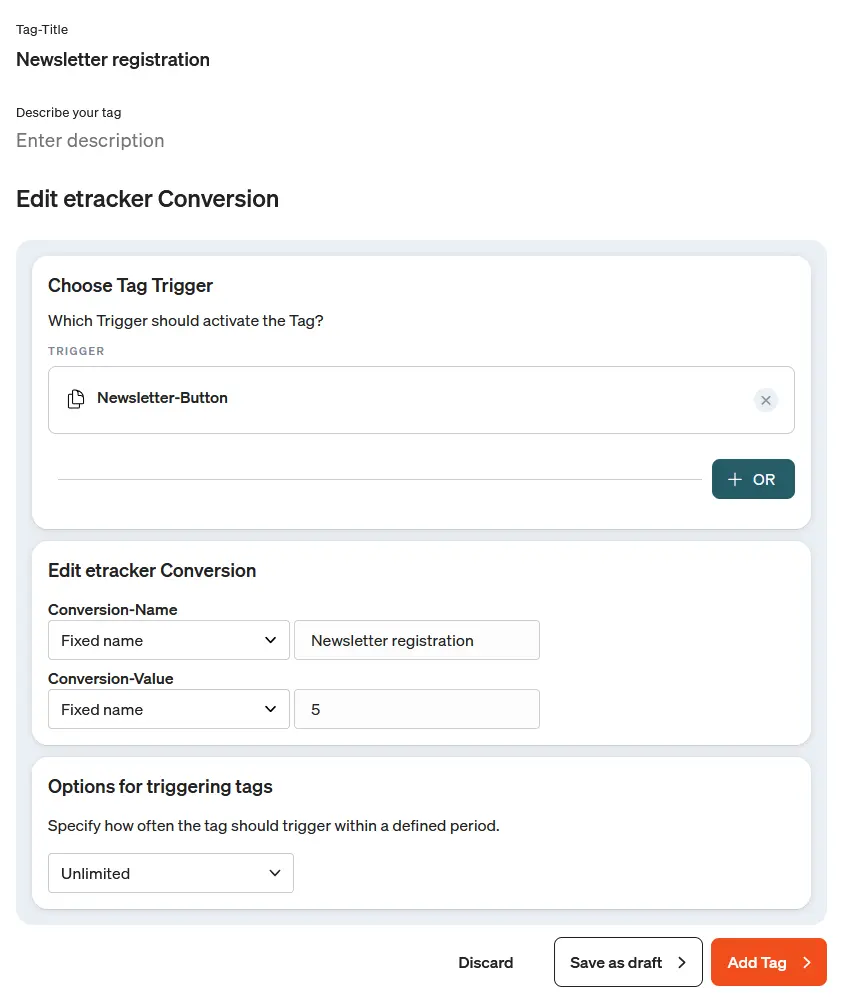
etracker Conversion
The etracker conversion tag is used to measure website performance such as the purchase of a product, registration for a newsletter or the click on a button.
Proceed as follows:
- Call up the tag manager menu item in etracker analytics.
- Click on + Add tag and select the type etracker Conversion from the etracker tags.
- Create a new triggerthat serves as a condition to trigger the tag. This could be, for example, a click on a specific element or scrolling to a specific section of the page.
- Now you can give your conversion a name and a conversion value. You can either assign fixed values or use variables.
- In the last step, you can define the frequency of the playout.
Unlimited: Every time the trigger condition is met.
Once per page view: The tag is only played once per page view, even if the trigger is triggered several times. If the page is reloaded with a reload or is called up again after visiting another page, the triggers are triggered again.
Once per trigger (session): If there are several triggers that trigger the same tag (or link), the tag is played several times. However, only once per trigger. If a new session begins, the same trigger can trigger the tag again. - Enter a name at the top under Tag title and optionally a description that explains in more detail what the tag does.
- The tag is published directly with Add tag. You can also save the tag as a draft and test it in debug mode before publishing it.
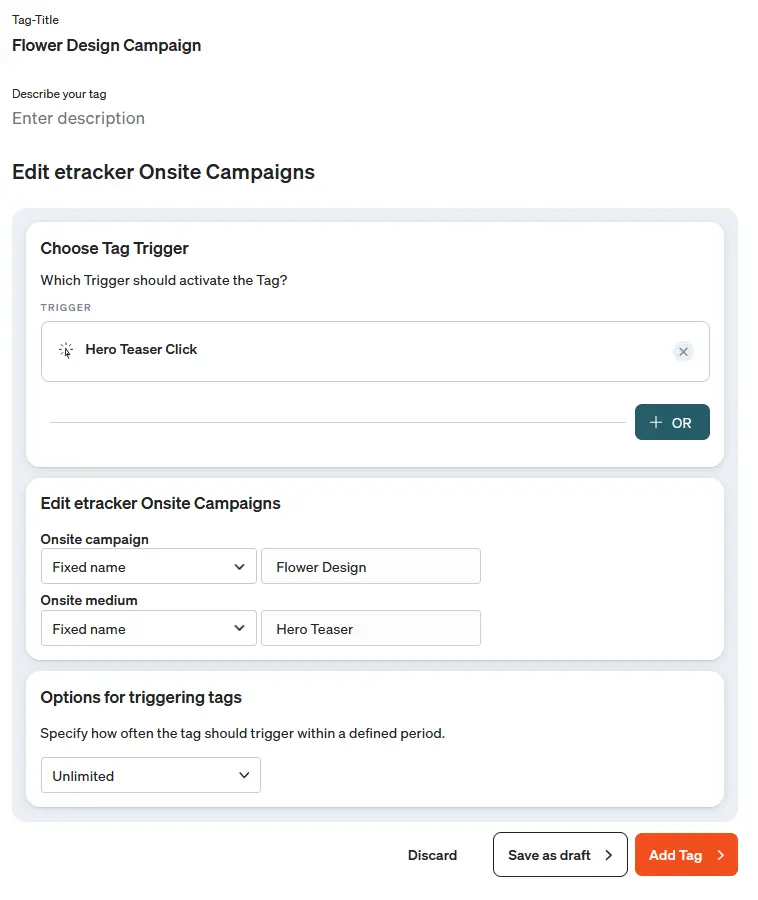
etracker onsite campaign
The etracker onsite campaign tag is used to measure and evaluate marketing campaigns or actions on your own website.
Proceed as follows:
- Call up the tag manager menu item in etracker analytics.
- Click on + Add tag and select the type etracker onsite campaign under the etracker tags.
- Create a new triggerthat serves as a condition to trigger the tag. This could be a click on a banner, for example.
- Now you can give your onsite campaign a name and specify the associated medium. You can either assign fixed values or use variables.
- In the last step, you can define the frequency of the playout.
Unlimited: Every time the trigger condition is met.
Once per page view: The tag is only played once per page view, even if the trigger is triggered several times. If the page is reloaded with a reload or is called up again after visiting another page, the triggers are triggered again.
Once per trigger (session): If there are several triggers that trigger the same tag (or link), the tag is played several times. However, only once per trigger. If a new session begins, the same trigger can trigger the tag again. - Enter a name at the top under Tag title and optionally a description that explains in more detail what the tag does.
- The tag is published directly with Add tag. You can also save the tag as a draft and test it in debug mode before publishing it.
etracker onsite search
The search function can be recorded via the etracker tag manager, by means of automatic recording or etracker code parameters.
The onsite search tag offers the option of recording not only the search terms but also whether there were any matching hits and how many hits.
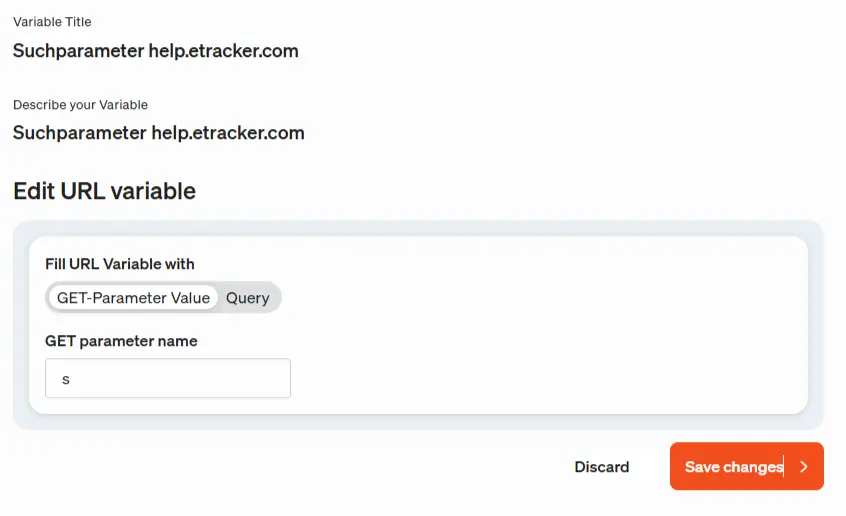
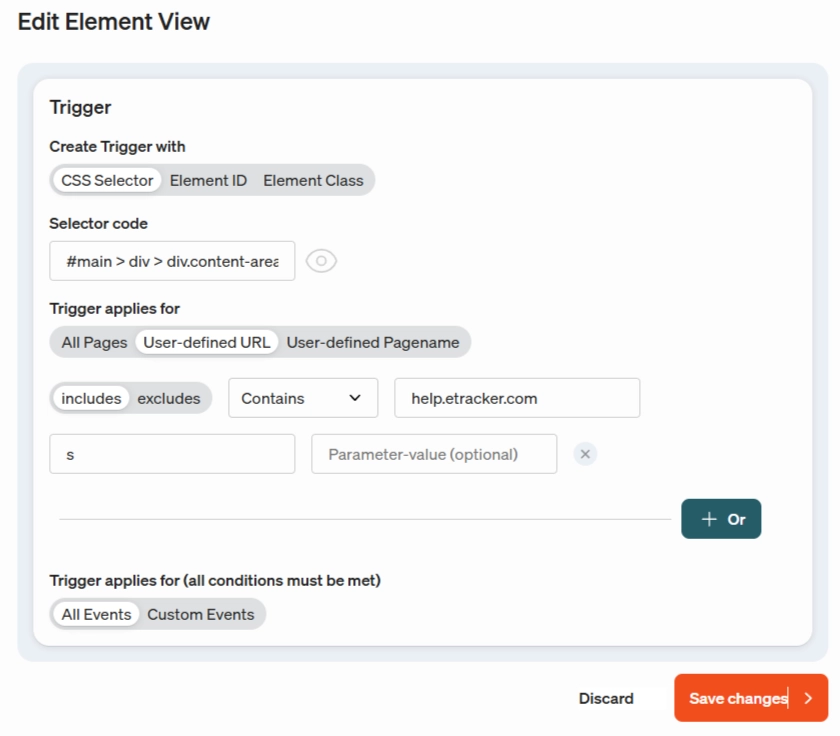
And this is how it works using the example of https://help.etracker.com/
The documentation search is triggered via the URL parameter s , a URL with search looks like this: https://help.etracker.com/?s=suchbegriff
- To read the search term from the URL, a variable is created that contains a GET parameter value, in our case s:
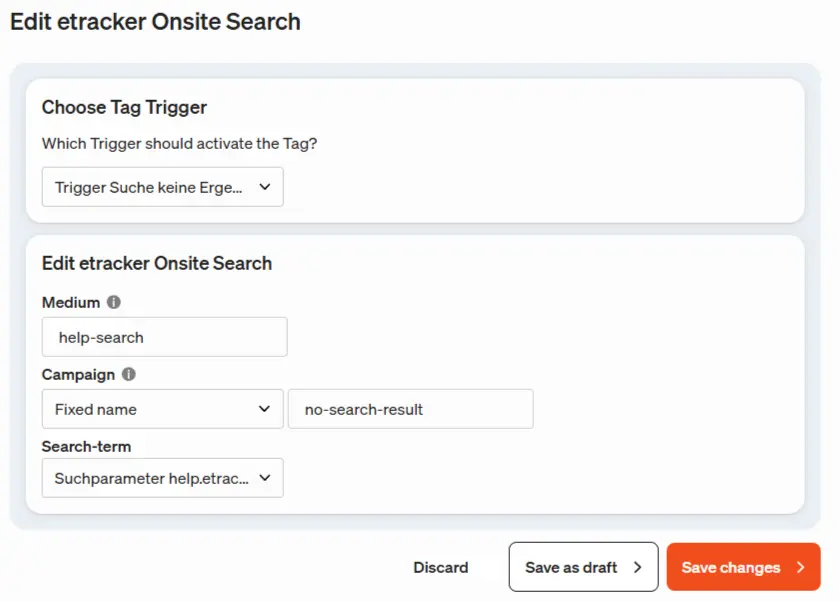
- For search queries without results, a trigger is created that fires when a certain element that only appears on the empty results page is visible:
- The trigger initiates the new tag internal search, which fills the parameters medium and campaign. In addition, the search term is filled via the variable created in step 1:
- In the last step, you can define the frequency of the playout.
Unlimited: Every time the trigger condition is met.
Once per page view: The tag is only played once per page view, even if the trigger is triggered several times. If the page is reloaded with a reload or is called up again after visiting another page, the triggers are triggered again.
Once per trigger (session): If there are several triggers that trigger the same tag (or link), the tag is played several times. However, only once per trigger. If a new session begins, the same trigger can trigger the tag again. - Enter a name at the top under Tag title and optionally a description that explains in more detail what the tag does.
- The tag is published directly with Add tag. You can also save the tag as a draft and test it in debug mode before publishing it.
Similarly, an onsite search campaign with results can be created. A detailed measurement and analysis of the internal search can thus be set up within a few minutes without any intervention in the HTML of the website.
etracker dimension
etracker automatically measures many dimensions such as location or the device used. However, it is also possible to measure your own dimensions, which can only be accessed if this information is provided by the website itself. The “etracker dimension” tag is used for this purpose.
Proceed as follows:
- Call up the tag manager menu item in etracker analytics.
- Click on + Add tag and select the type etracker Dimension from the etracker tags.
- Create a new triggerthat serves as a condition to trigger the tag. For example, a page view.
- You can now select an existing custom dimension and specify how the value should be set. For example, using a variablethat reads the URL parameter associated with the dimension.
- In the last step, you can define the frequency of the playout.
Unlimited: Every time the trigger condition is met.
Once per page view: The tag is only played once per page view, even if the trigger is triggered several times. If the page is reloaded with a reload or is called up again after visiting another page, the triggers are triggered again.
Once per trigger (session): If there are several triggers that trigger the same tag (or link), the tag is played several times. However, only once per trigger. If a new session begins, the same trigger can trigger the tag again. - Enter a name at the top under Tag title and optionally a description that explains in more detail what the tag does.
- The tag is published directly with Add tag. You can also save the tag as a draft and test it in debug mode before publishing it.

Wrapper
The wrapper tag is one of three ways to measure virtual page views with etracker analytics (see Measuring single page applications).
Proceed as follows:
- Call up the tag manager menu item in etracker analytics.
- Click on + Add tag and select the type Wrapper from the etracker tags.
- Create a new triggerthat triggers the virtual page view. This could be, for example, a click on a specific element or scrolling to a specific section of the page.
- Define a name for the page name. This can also be done using selected or newly defined variables .
- Optionally, you can also assign the page to a specific area or page group, for example the navigation or breadcrumb area.
- Enter a name at the top under Tag title and optionally a description that explains in more detail what the tag does.
- The tag is published directly with Add tag. You can also save the tag as a draft and test it in debug mode before publishing it.
E-commerce events using DataLayer
Using the e-commerce etracker tags, you can read e-commerce events (product viewed, added to shopping cart, order) directly from the data layer of your website. This offers you maximum flexibility without having to intervene directly in the source code of the page. The following steps describe the “Product viewed” event and apply analogously to the other e-commerce events.
This manual setup is only necessary if there is no ready-made etracker plugin for your store system. When using an etracker plugin, the e-commerce information is automatically transmitted to etracker.
1. requirements
Before you start with the configuration in the etracker tag manager, check whether your store system fills the DataLayer variable with e-commerce information (ideally in the GA4 standard).
2. create the appropriate e-commerce tag
etracker offers specialized tags for the evaluation of the most important e-commerce events.
- In the etracker tag manager, go to “Tags” and click on “Add tag”.
- Select the appropriate e-commerce tag from the templates:
- Product seen
- Added to shopping cart
- order

3. read values from the DataLayer (mapping)
The fields in the tag must be mapped correctly so that etracker knows which information (e.g. article number or price) is to be transferred.
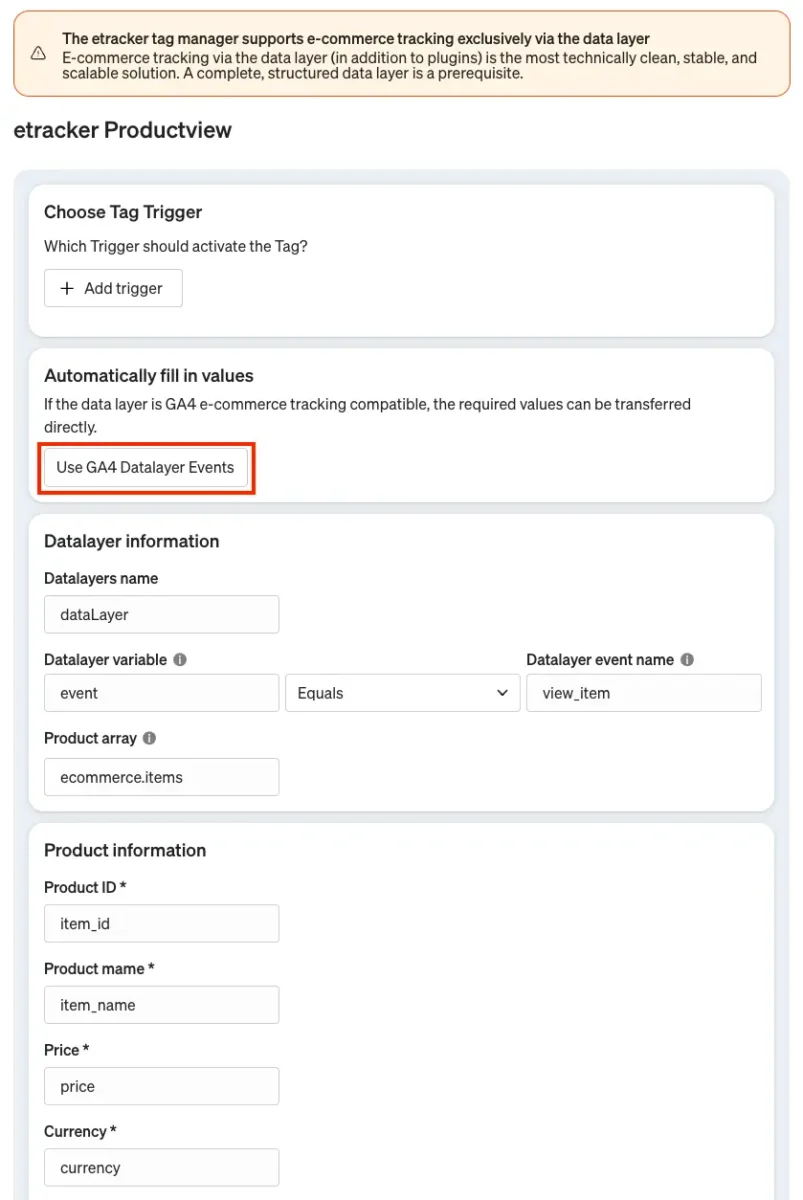
Variant A: Use of the GA4 DataLayer standard (recommended)
Many store systems and plugins use the GA4 standard for the DataLayer. In this case, the setup is particularly simple:
- Click on the “Use GA4 Datalayer Events” button in the configuration window of the tag.
- All relevant fields (product ID, product name, price, currency, etc.) are automatically filled with the appropriate values from the DataLayer.
Variant B: Manual configuration
If your store system does not use the GA4 standard variables in the data layer, check whether there are ready-made plugins that take over this task. If this is not the case, you can configure the DataLayer variables manually.
If you enter the paths to the values manually, enter the exact variable name under which the information can be found in the DataLayer object.
If the store system does not write any e-commerce values to the DataLayer, you can also write them manually to the DataLayer yourself using the etracker tag manager and then read them from the e-commerce tags again.
4. create trigger (When should the tag trigger?)
A tag requires a trigger condition. You are completely flexible here: for example, you can trigger the tag when a specific URL is called up or a specific button is clicked.
In practice, however, it makes the most sense to use the DataLayer Push itself as a trigger. As soon as the store system pushes the information into the DataLayer, the tag manager recognizes this event and triggers the etracker tag precisely.
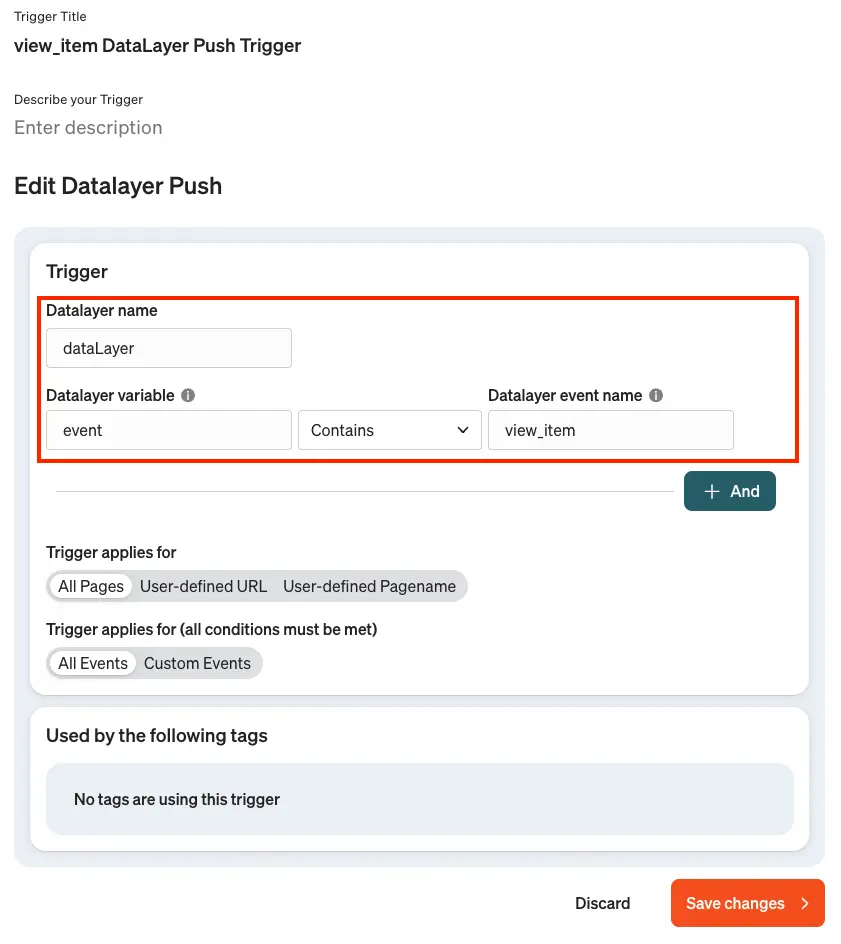
- Create a new trigger of the type “Datalayer-Push”.
- Specify the name of the event to which the trigger should listen. In the GA4 standard, this is often the case:
- view_item (for “Product seen”)
- add_to_cart (for “shopping cart”)
- purchase (for the purchase)
- Then link the trigger to the corresponding e-commerce tag.
5. testing & debugging
Before you publish the changes, you can check the tag as a draft in debug mode:
- Start the debug mode by adding the URL parameter “et_debug=1” to the URL.
- Navigate to a product detail page in your store.
- Check in the debug console whether the trigger for “Product seen” was successfully triggered for the tag.
- Tags are not executed by default in debug mode.
- When you open a tag, you can execute it by clicking on the play button. This also works for tags that are still in draft status.
6. control & evaluation
If an e-commerce tag has been executed, you will find the data in your reports under E-Commerce Reports → Product Performance
Here you can now analyze how often products were viewed, added to the shopping cart and actually purchased.