Easily Conduct A/B Tests with the etracker Tag Manager
What It’s All About
Have you ever wondered whether a red “Buy” button gets clicked more often than a green one? Or whether a different headline on your website could lower the bounce rate? In web analytics, there’s a clear answer to that: Don’t guess—test it!
With A/B testing, you randomly show two or more versions of a webpage to your visitors. Half see Version A (the original), and the other half see Version B (the modified version). In the end, the raw numbers in your reports determine which version was more successful. The benefit for you is clear: you optimize your website based on data, increase your conversion rate, and get the most out of your traffic.
The Challenge: Missing Features in the CMS or E-commerce Platform
The theory sounds simple, but in practice, it often falls short due to technical limitations. Many content management systems (CMS) or e-commerce platforms do not offer built-in A/B testing functionality. The result? You either have to rely on expensive third-party tools, or the IT department has to make time-consuming adjustments directly to the website code. That costs time, money, and patience.
The Solution: A/B Testing Directly Through the etracker Tag Manager
We have good news for you: With the etracker tag manager, you already have everything you need to run successful A/B tests!
You don’t need any additional modules, any programming knowledge, and—most importantly— no access to your website’s source code. The etracker tag manager handles the display of the variants virtually “on the fly” in the user’s browser.
Below, you’ll learn how to set up such a system and how seamlessly everything works together behind the scenes.
Preparation: What You Should Consider in Advance
Before you open Tag Manager, lay the groundwork for your test. To do this, simply answer the following five questions:
- Which website element should be changed? (e.g., the main heading, a button’s corporate color, or a teaser image)
- What exactly should this element look like in Variant B? Here, define the specific customization—for example, the new text for the heading or the exact color value of the button.
- How should the traffic be distributed? Decide what percentage of your visitors should see the new version (typically 50/50, or for riskier tests, perhaps 80/20 in favor of the original to start with).
- Should the visitor be reminded of this option? Generally speaking, yes, so that a user doesn’t suddenly see a different design when they return to the site.
- What should be the purpose of the test? Think about how you will measure success (e.g., more clicks on an element or more form submissions). If necessary, it may be a good idea to set up an appropriate conversion in etracker in advance.
The Results: Who Will Win?
To measure the performance of the variants afterward, each group is transmitted to etracker analytics via a dimension tag. This tag passes the information about which group the user belongs to (e.g., “red”) to etracker analytics as a “Custom Dimension” of the “User” type.
In your etracker reports, you can then analyze the behavior of the comparison groups in great detail. You’ll immediately see which variant led to more clicks, longer session durations, or higher revenue, and you can continuously and successfully optimize your website.
An A/B test only yields reliable results if a sufficiently large number of visitors and conversions have been achieved. To verify whether a variant’s success is statistically significant and not merely a coincidence, you can easily validate the data mathematically. Feel free to use the free confidence calculator from our partner, Konversionskraft.
Privacy and Consent Regarding the Use of LocalStorage
When it comes to technical implementation, there are two important aspects to consider regarding data storage and data protection:
- Persistence of Storage: Unlike SessionStorage (which is deleted when the browser tab is closed), the LocalStorage used in the following example script remains in the visitor’s browser by default even after the current session ends. This ensures that returning users remain permanently assigned to the same test variant even during subsequent visits.
- Data Protection Classification: Since the script stores data locally on the user’s device and processes personal data, the provisions of the TDDDG and the GDPR apply. In this context, it must be assessed in advance whether the A/B test can be classified as primarily “user-oriented.” If, on the other hand, the test primarily serves the interests of the website operator, the test may only be conducted after consent has been granted (opt-in).
In practice, this means: If there is no blanket permission, the Tag Manager must be used to ensure that the custom event tag is served exclusively to users who have consented to the “Statistics” category in the Consent Manager.
The data protection assessment of web analytics and testing measures may vary depending on the design, purpose, and target audience of the test. The information provided here does not constitute legal advice and cannot replace an individual review by a data protection officer or a legal department.
Here’s a brief summary of how the setup works in Tag Manager
To implement the test technically, we use the built-in features of our etracker tag manager in combination with the settings in etracker analytics. The process is logically structured and requires the interaction of a total of five components:
- The trigger: This determines when and where the test should take place—for example, the moment a visitor accesses the relevant web page.
- A Custom Event Tag (Custom JavaScript): This tag handles the actual logic. It checks in the background at lightning speed whether the website visitor has already been assigned to a variant (A or B). If not, the tag randomly assigns the visitor to one of the variants based on your desired distribution (e.g., 50/50), stores the result in the browser’s LocalStorage, and visually overrides the webpage element for the user assigned to variant B.
- A Custom Dimension: You create this outside of Tag Manager in etracker analytics so that you can display a new user-specific analysis group in the reports.
- A Web Storage variable: This is created in Tag Manager to read the value of the group (e.g., “green” or “red”) directly from the browser’s LocalStorage.
- A Dimension Tag: This tag links the variable to the custom dimension and ensures that the information about which group the user belongs to is automatically transmitted to your reports.
Since this test is controlled entirely through the etracker tag manager, there is one technical detail to keep in mind: When the website is loaded, the default value stored in your CMS or e-commerce system is always displayed first. Only immediately afterward is the corresponding value overwritten via JavaScript in the DOM (the page’s document object model) locally in the visitor’s browser.
In practice, this can result in the website visitor seeing the original value for a very brief fraction of a second (flicker effect) before variant B appears. Keep this in mind when selecting the elements to test.
Even easier for JustRelate “Home” customers: Creation via AI prompt
For all customers using our JustRelate “Home” platform, setting up this type of A/B test will be even more convenient. You won’t even have to manually configure the necessary components (tags, triggers, variables, custom dimensions).
Simply describe your project in plain language using our AI assistant. The artificial intelligence will then generate the appropriate elements for you in no time.
(Click on the thumbnail to view or download the full-size screenshot.)

Step-by-Step Guide: How to Set Up Your First A/B Test
If you’re not yet completely familiar with the basics of our Tag Manager, we recommend taking a look at our official etracker tag manager documentation. You’ll also find a comprehensive self-paced course on the etracker tag managerthat will help you get started.

Follow these steps to set up the A/B test and the corresponding analysis. Simply customize the website element to be changed, the desired variants, and the distribution to suit your needs.
Creating the Trigger
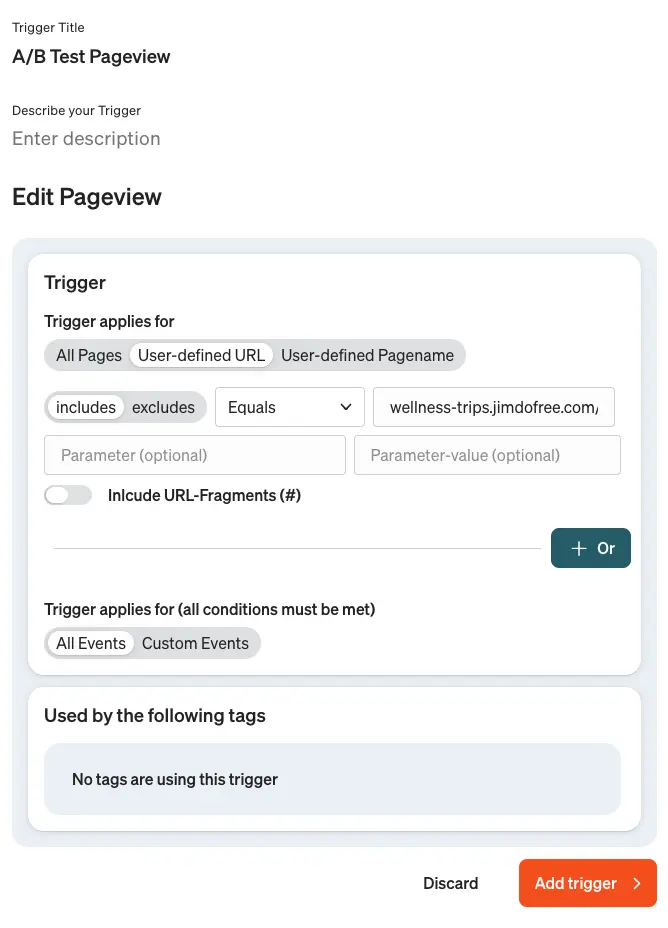
First, we’ll define when and on which page the A/B test should be activated. To do this, create a new trigger in etracker tag manager. For the condition, select, for example, a specific page view of the website where the element to be tested is located.
Creating the Custom Event Tag
Now let’s set up the core of the test: the tag that controls the logic and adapts the design in the user’s browser. Create a new tag of the ” Custom Event Tag” type.
- Important for implementation: Link this tag to the trigger you created in Step 1.
- Important setting: In the tag options, specify that this tag should be executed within the HTML BODY so that the web page element is already loaded in the browser when the code is executed.
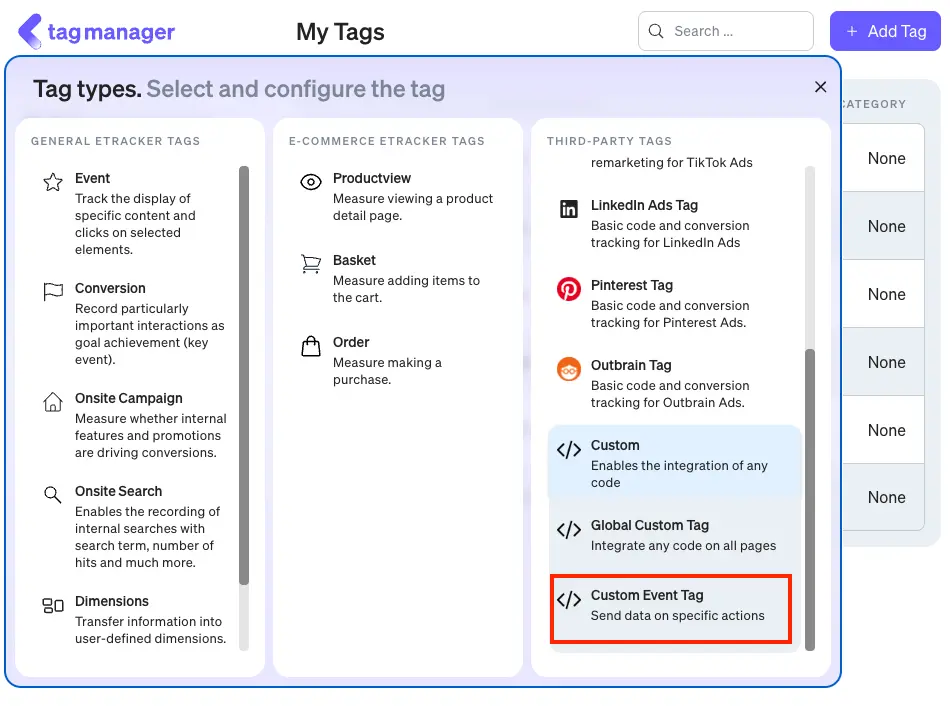
Paste the following JavaScript code into this tag:
<script>
(function() {
  // 1. Definition of the LocalStorage key and the test variants
  var STORAGE_KEY = 'ab_button_color';
  var variants = ['green', 'red'];

  // 2. Check if the visitor has already been assigned to a variant
  var variant = localStorage.getItem(STORAGE_KEY);
  if (!variant) {
    // If not, randomly assign green (50% chance) or red (50% chance) zugeordnet
    variant = variants[Math.random() < 0.5 ? 0 : 1];
    localStorage.setItem(STORAGE_KEY, variant);
  }

  // 3. Function for the visual adjustment of the element on the website
  function applyVariant() {
    // The CSS selector targets the specific element
    var el = document.querySelector('#cc-m-12550600721 > div > a');
    if (el) {
      el.style.backgroundColor = variant; // Background color is set to the determined variant
    }
  }

  // 4. Ensure that the script only runs once the element is loaded
  if (document.readyState === 'loading') {
    document.addEventListener('DOMContentLoaded', applyVariant);
  } else {
    applyVariant();
  }
})();
</script>
Important Note on Copying This Code: Please note that this is a specific example. If you copy this code for your own website, you must customize the CSS selector, the style (or the element’s Contents), and the corresponding values to suit your needs.
You can easily determine the correct CSS selector by right-clicking on the desired element on the website, clicking “Inspect,” right-clicking again on the highlighted element in the displayed HTML code, and selecting “Copy > Selector.” Then simply paste this value into the quotation marks at querySelector('...'). You can also easily test the CSS selector using the Debug Mode window, which opens when you append ?et_debug=1 to your page’s URL.
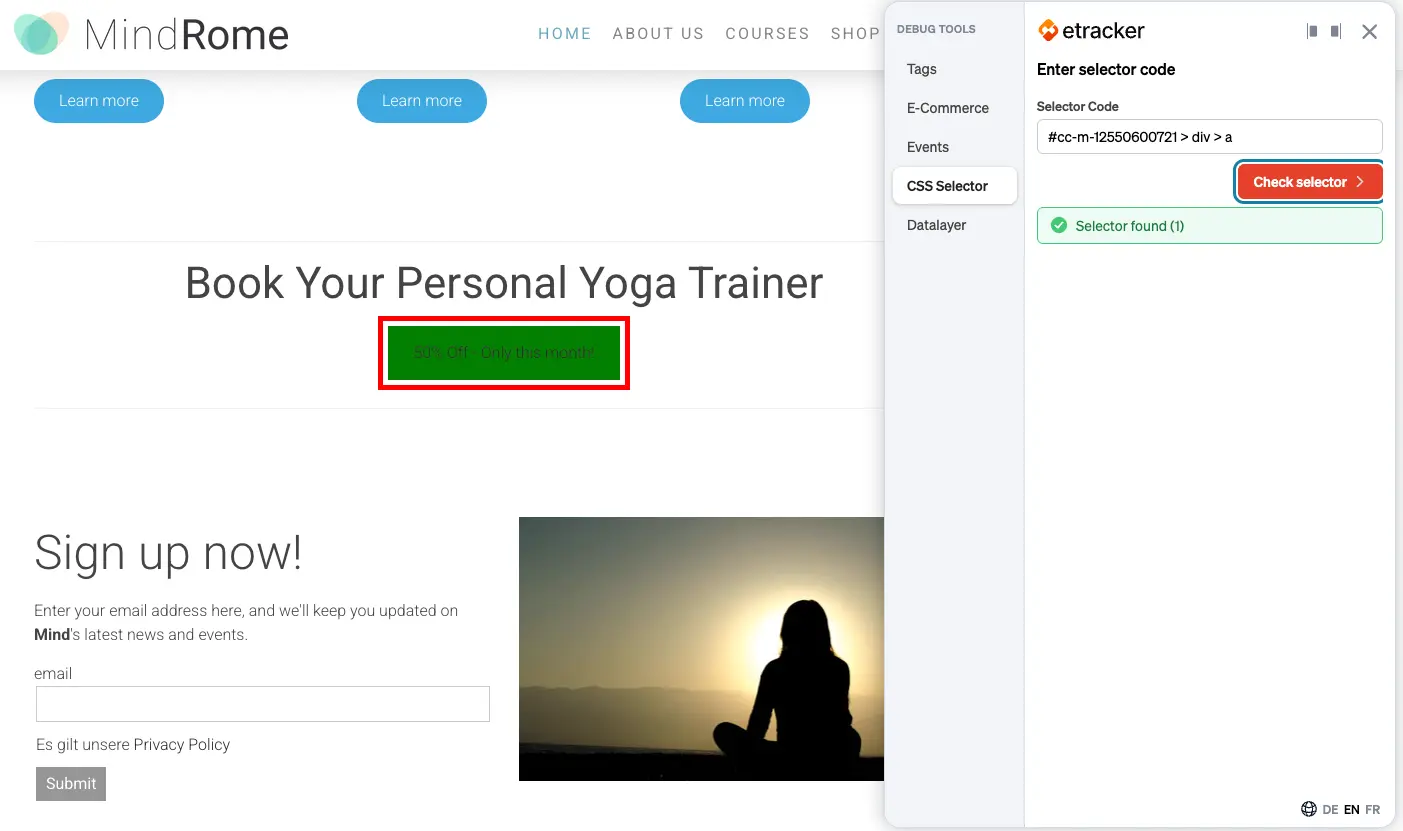
What does this code do? The script first defines a fixed storage location (ab_button_color) in the user’s browser, as well as the two test colors, green and red. When the page is loaded, it instantly checks whether the user has visited the site before and has already been assigned a color. If that’s not the case, chance (with a 50-50 split) determines whether the user is assigned to the “Green” or “Red” group. This decision is permanently stored in LocalStorage. Finally, the script uses the CSS selector you provided to search for the exact element on your website and changes its background color.
Create a Custom Dimension in etracker analytics
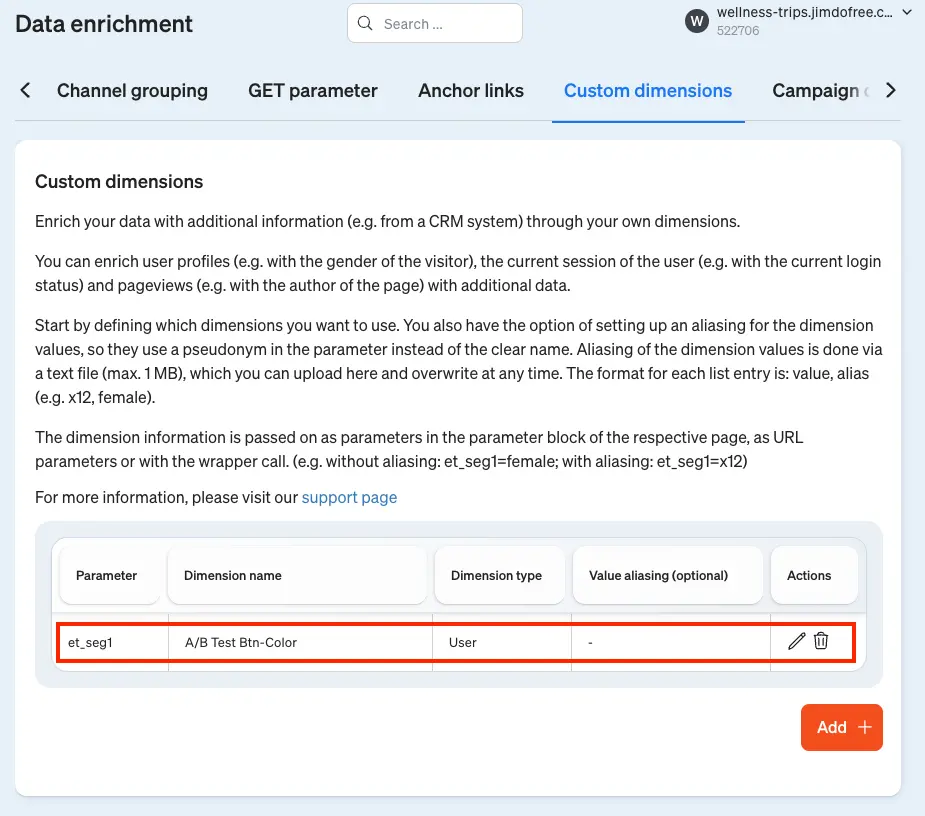
To ensure that the data not only remains in the user’s browser but also appears in your reports, we need to configure etracker analytics accordingly. Outside of etracker tag manager, navigate to Account > Data Enrichment > Custom Dimensions in your etracker account and create a new dimension of the “User” type (e.g., named “A/B Test Btn-Color”).
Create a LocalStorage variable in Tag Manager
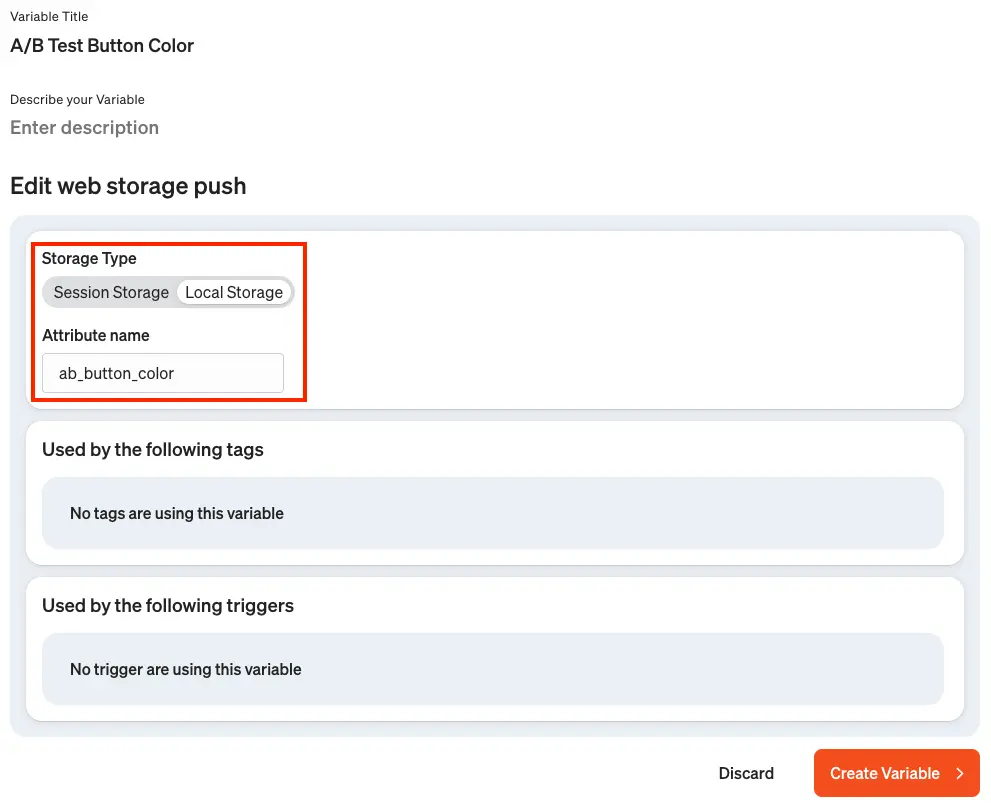
Switch back to the etracker tag manager. We need to teach the Tag Manager how to read the value from the user’s browser. Create a new variable of type “Web Storage.” For the storage type, select “Local Storage, ” and enter the exact key name from our script in the “Key” field: ab_button_color.
Create a Dimension Tag for Data Transfer
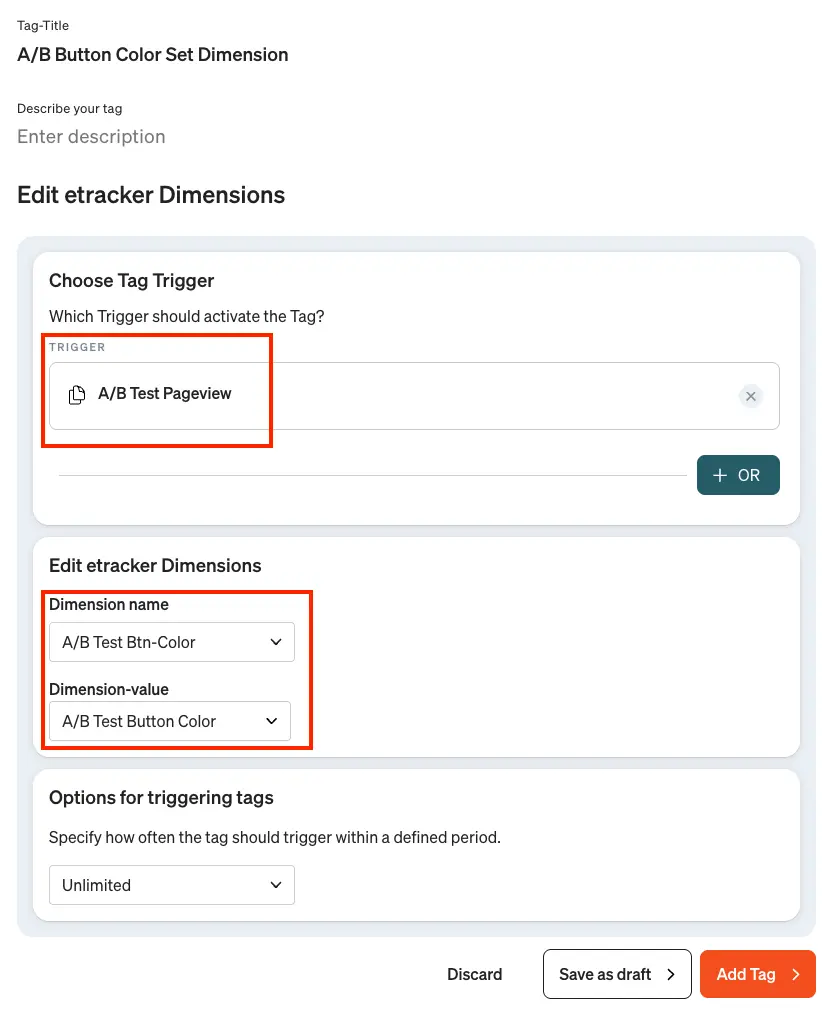
Now let’s link the variable to the dimension. Create a new tag of type “Dimension. “
- Use the exact same trigger from Step 1 (the page view).
- In the tag, select the custom dimension you created in step 3 and populate it with the value of the Web Storage variable you created in step 4.
As soon as you publish the changes in Tag Manager, the user’s respective group will be automatically transmitted to etracker analytics for every qualified page view.
Live Testing in the Browser Developer Tools (Debugging)
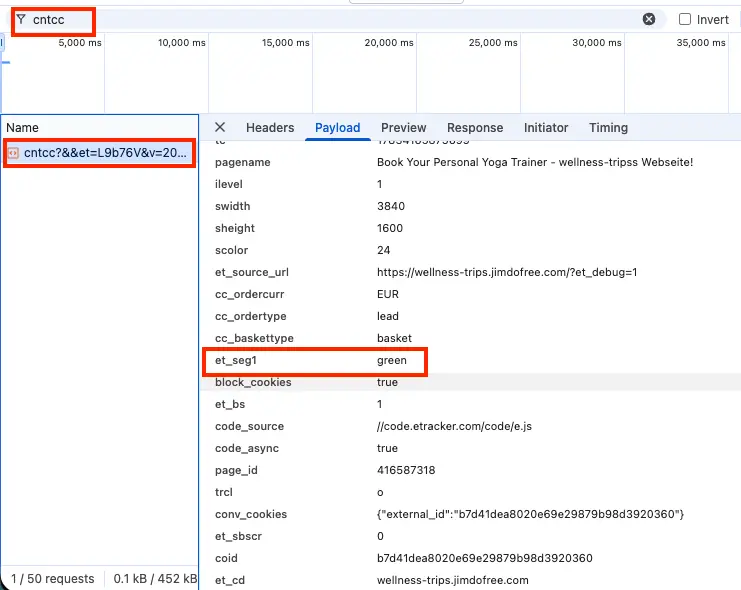
To see right away whether the setup works, you don’t have to wait for the data to be processed in the reports. Simply open your website, right-click, and select “Inspect” (or press F12) to open the browser’s developer tools. Switch to the “Network” tab and enter cntcc in the filter field.
If you now reload the page (in debug mode, make sure that “Actually trigger tags” is enabled), you’ll see the etracker tracking call. Click on it and search the parameters for entries such as et_seg1 through et_seg5 (depending on where you created your custom dimension). There you’ll see the passed value (“green” or “red”) right away.
Analysis in the etracker Reports
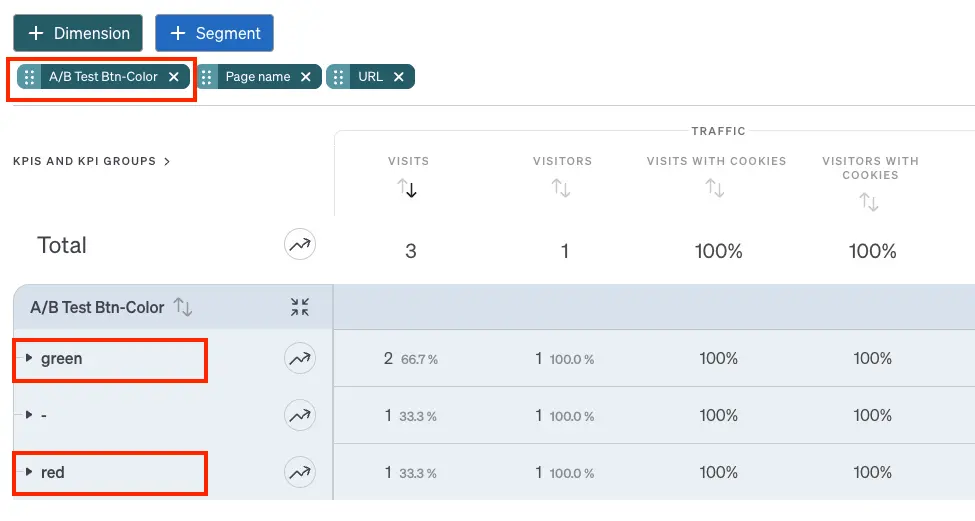
Once the test has been active for a sufficient period of time, you can begin analyzing the data. To do this, open your reports in etracker analytics. By adding the new dimension, configuring a filter, or creating segments, you can directly compare the performance of Variant A and Variant B.
You can see at a glance which option led to more conversions, a higher click-through rate, or a longer time spent on the site, and you can optimize your website specifically based on this valid user data.
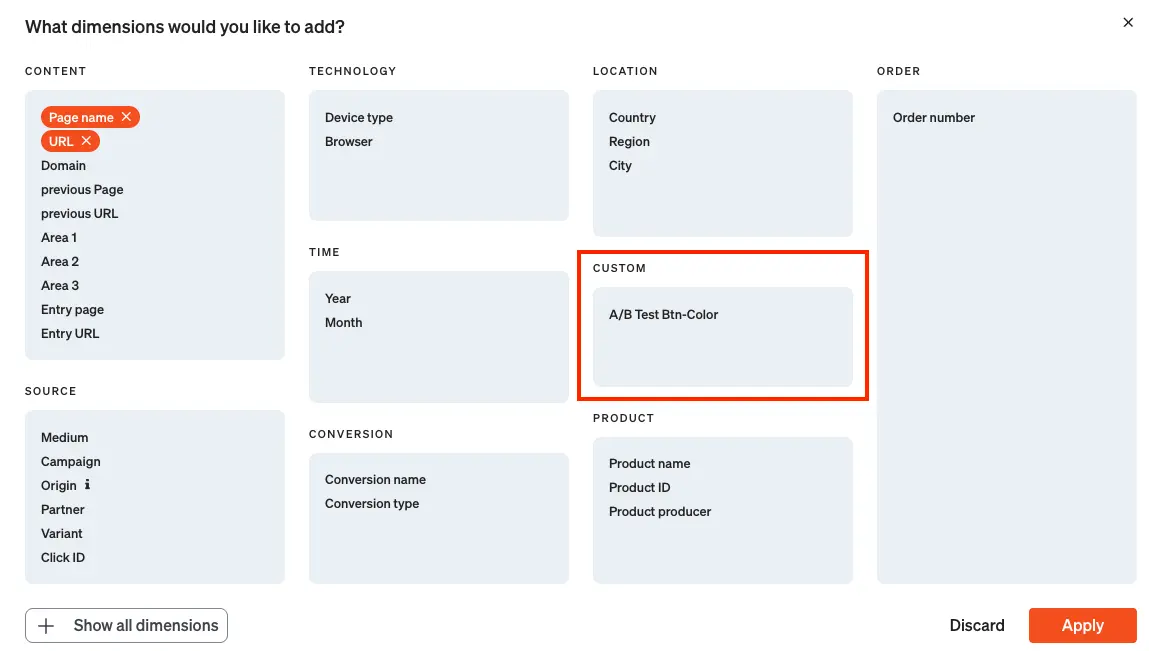
View the new “Custom Dimension” in the report:
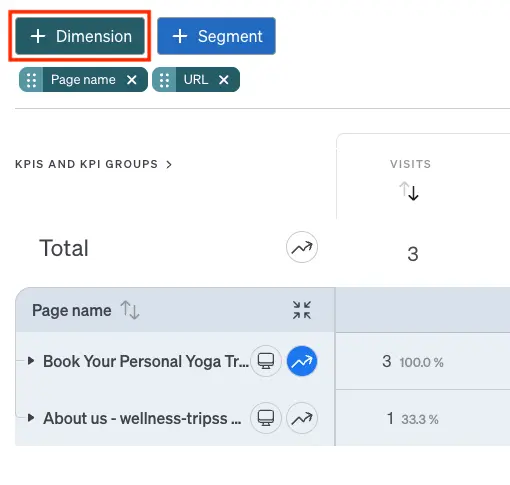
You can include the new “Custom Dimension” in your reports and move it to any position in the dimension order.
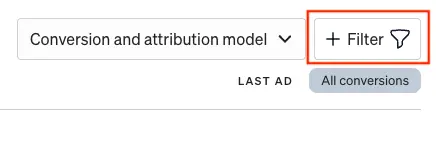
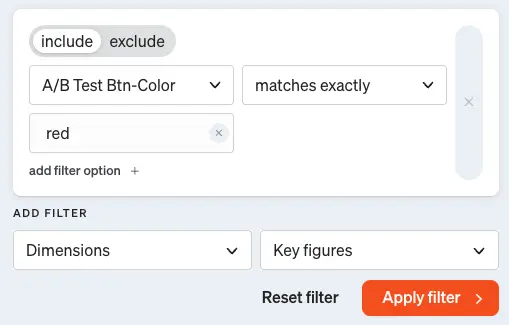
To apply the new “Custom Dimension” to a filter:
In the upper-right corner of the reports, you can filter by specific dimensions or exclude them.
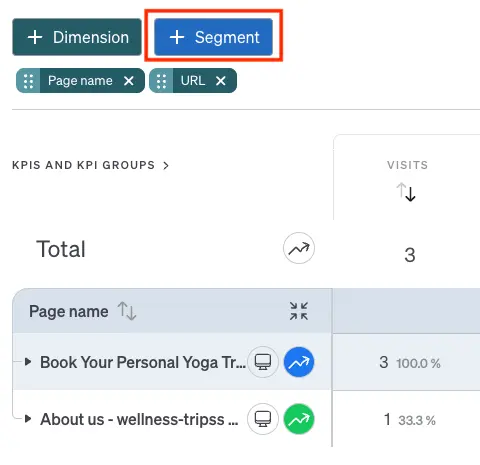
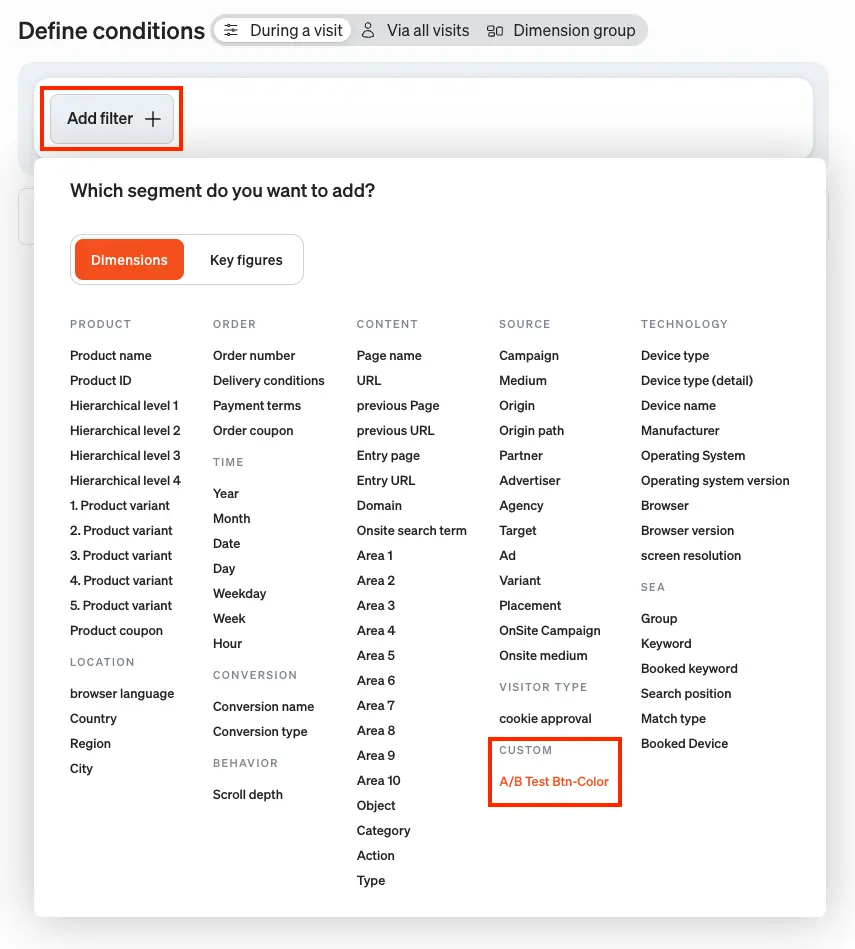
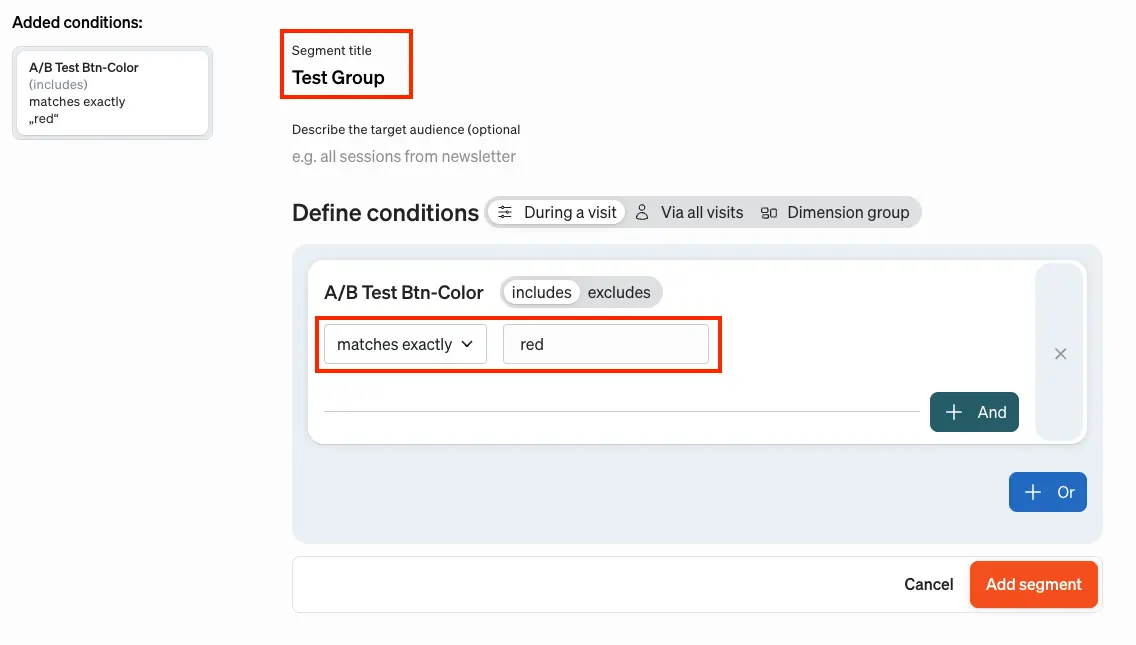
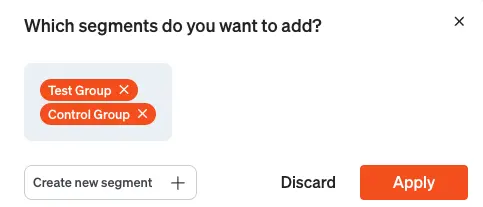
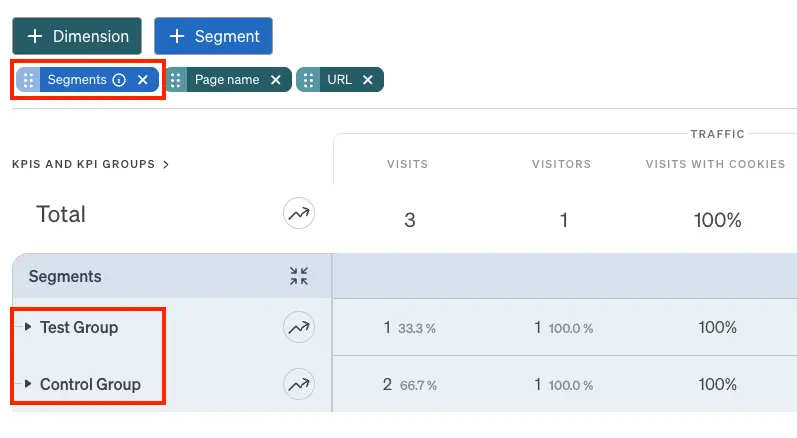
Create segments based on the “Custom Dimension”:
Using segments, you can also filter by the custom dimension in combination with the corresponding values and then display the segments simultaneously in the report.
Conclusion: Data-Driven Optimization Made Easy
A/B testing doesn’t have to be expensive or technically complex. With etracker tag manager, you have a powerful tool at your disposal to identify opportunities for optimization on your website without making any changes to the source code. From strategic planning and technical setup to statistically validated analysis in the etracker analytics reports, the entire process can be seamlessly mapped out. Take advantage of this opportunity to stop making design decisions based on gut instinct and instead sustainably increase your conversion rate based on real user data.