Google Ads Connector
Our etracker e-learning platform offers a free video course on conversions and campaigns that provides a comprehensive explanation of “conversion uploads.”
Click here to go directly to the course:
https://academy.etracker.com/course/conversions-and-campaigns

With etracker analytics Pro and Enterprise, Google Ads campaigns can be evaluated conveniently and in compliance with data protection regulations. In addition, Google Ads conversion tracking with etracker analytics in the cookie-free standard is consent-free and therefore records all conversions regardless of whether statistics cookies are accepted or rejected.
If conversion actions are already recorded with etracker analytics – either as orders (leads), purchases (sales) or target achievements (specific clicks or page views via the target wizard) – the setup consists of just two steps:
- Setting up Google Ads campaign tracking and
- Setting up the Google Ads conversion upload
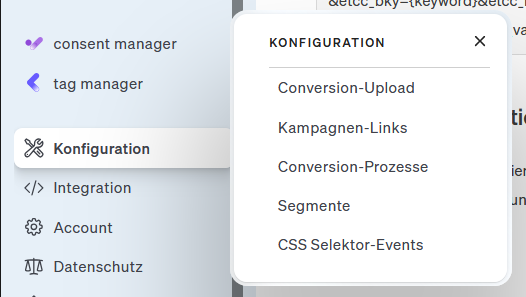
In your account, go to Configuration → Conversion upload:
Here you will be guided through the entire set-up process in detail:
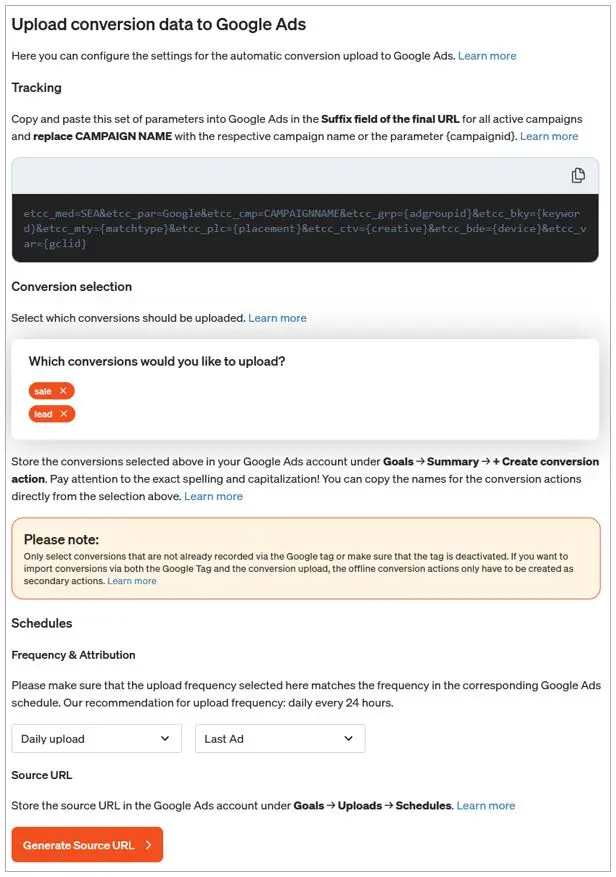
In order to optimize the measurement accuracy of your Google Ads despite the increasing limitations of classic cookie and URL parameter tracking, etracker supports the use of Enhanced Conversions. This is activated by using the corresponding variable“Data provided by users“. Please take into account the legal requirements and consent adjustments.
Setting up Google Ads campaign tracking
Would you like to measure the success of your Google Ads campaigns in a data protection-compliant and content-independent manner with etracker analytics? No problem.
In Google Ads, the field Suffix of the final URL was created for tracking purposes. The entries in this field are added to the campaign link when an ad is delivered by Google Ads and then always forwarded to the landing page. They are automatically recorded on the landing page via the etracker count.
We recommend defining the suffix of the final URL at campaign level to enable descriptive campaign names in the evaluations. Unfortunately, Google Ads only offers a placeholder for the campaign ID, but not for the campaign name.
And this is what the entry in theSuffixfieldof the final URLlooks like at campaign level:
etcc_med=SEA&etcc_par=Google&etcc_cmp=KAMPAGNENNAME&etcc_grp={adgroupid}&etcc_bky={keyword}&etcc_mty={matchtype}&etcc_plc={placement}&etcc_ctv={creative}&etcc_bde={device}&etcc_var={gclid}(Replace CAMPAIGN NAME with the actual name of the respective campaign).
Simply copy and paste the parameter set into the Suffix field of the final URL in Google Ads:
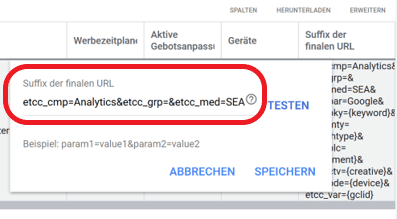
If youdon’tsee the “Final URL Suffix” columnunder Campaigns → Campaigns → Ads, simply add it using the column selector above the table.

The suffixes can also be added by downloading a list of your ads via your Google Ads Editor, adding them and then uploading them again. This is recommended if you want to add a suffix to the final URL for a large number of campaigns. To do this, follow these steps:
- Sign in to your Google Ads account.
- Click onCampaigns → Campaigns → Ads.
- Click onDownloadat the bottom right of the graphic.
- Complete theSuffixcolumnof the final URLand save the changes.
- Upload the edited list to Google Ads.
What to do if there is no etracker code on the target page?
If ads lead to pages without etracker code, it is not possible to record clicks using simple URL parameters.
In this case, please proceed as follows:
- Enter the target page as the final URL in your Google Ads Editor.
- Add a suitable etracker campaign redirect (redirect link) under URL options in theTracking templatefield. The campaign redirect can look like this:
https://www.etracker.de/ccr?etcc_url={lpurl}&et=ACCOUNTSCHLÜSSEL&etcc_med=SEA&etcc_par=Google&etcc_cmp=KAMPAGNENNAME&etcc_grp={adgroupid}&etcc_bky={keyword}&etcc_mty={matchtype}&etcc_plc={placement}&etcc_ctv={creative}&etcc_bde={device}&etcc_var={gclid}Replace the value CAMPAIGN NAME with the actual name of the respective campaign.
Replace the value ACCOUNT KEY with your personal account key, which you can find in your etracker account under the menu item Account → Account → Account key can be found.
The redirects can optionally also be created in the etracker link generator. You can find this in your account underConfiguration → Campaign links.
Please only use counting via a redirect link if there is no etracker code on the target page. Otherwise the data will be recorded twice.
Setting up the Google Ads conversion upload
Would you like to optimize your Google Ads campaigns using etracker data? That’s no problem with the Google Ads Conversion Upload. The only requirement is that you’ve set up Google Ads campaign tracking as described above.
The automatic upload of conversion data to Google Ads makes it possible for you,
- see the conversion rates and sales of your campaigns directly in Google Ads, so that you can manage and analyze campaigns completely in Google Ads.
- conversions and sales for automatic bidding strategies such as target CPA or target ROAS.
Once set up, the upload runs automatically. The setup is completed in just three steps:
Step 1: Setting up the conversion upload settings in etracker analytics
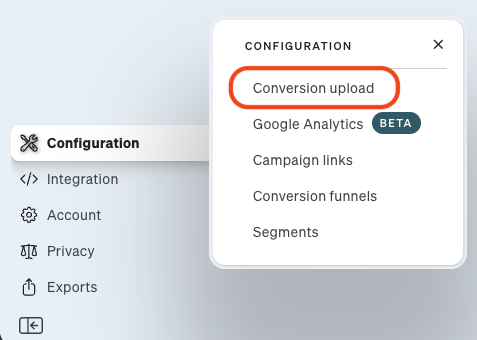
Go to Configuration → Conversion upload:
- Selecting the conversions to upload
- Setting the interval for the upload
- Since Google Ads no longer accepts external selection of the attribution model, “Attribution in Google Ads” must be selected. However, the attribution model can still be selected within Google Ads. (More information)
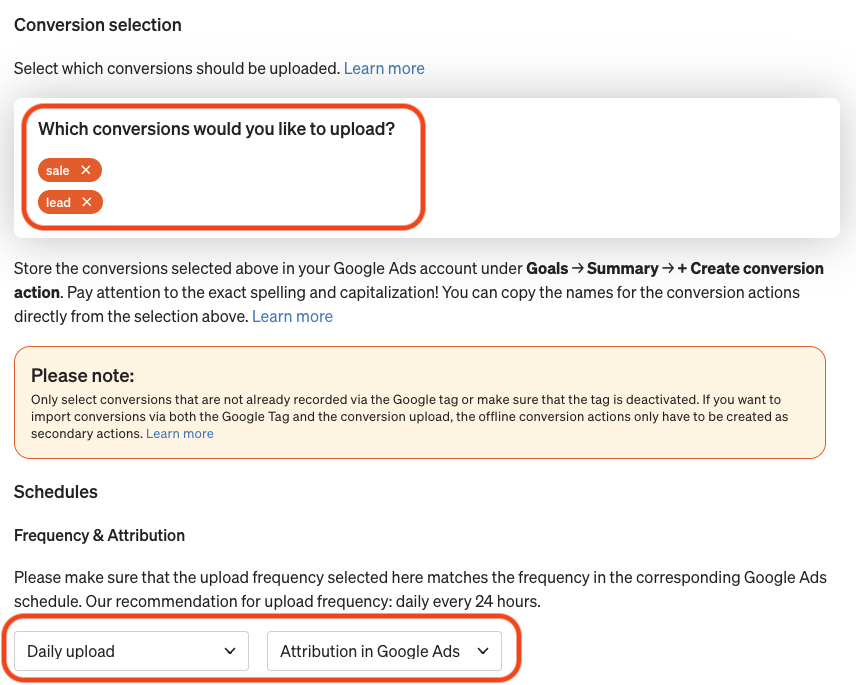
Adaily uploadloads the data of the last day (yesterday) into Google Ads, aweekly uploadloads the data of the last seven days (yesterday, the day before yesterday, …).
The upload frequency selected here must match the frequency set later in Google Ads!
Finally, generate the source URL. You’ll need this to enter it into Google Ads later. For configuration with Data Manager (Step 2a), the URL must end with “…/etrackerConversions.csv.”
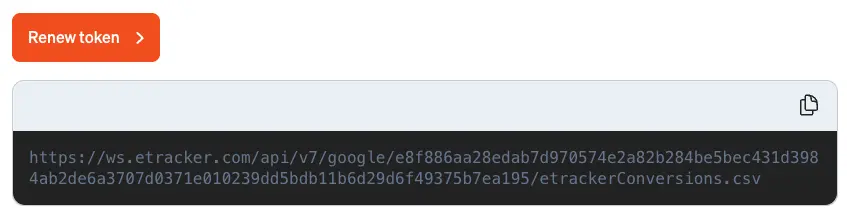
If a URL is still displayed that does not end in “…/etrackerConversions.csv” and you want to configure Google Ads using Data Manager (Step 2a), make sure that the attribution is set to “Attribution in Google Ads” and refresh the token. A URL in the new format will then be generated.
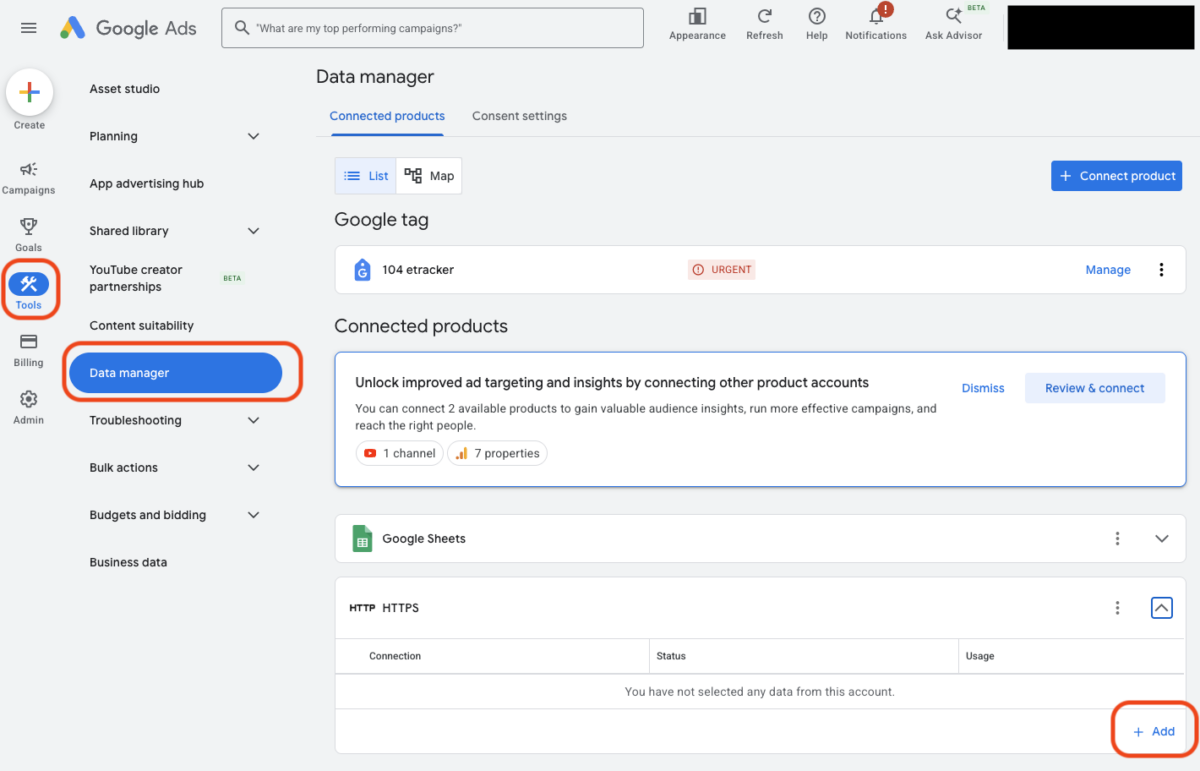
Step 2a: Setting up conversion uploads in Google Ads (via Tools → Data Manager → HTTP HTTPS)
The following section describes how to configure conversion uploads via Data Manager. Previously, this was possible via “Schedules.” Google Ads is gradually phasing out this option. For backward compatibility, the old instructions can still be found in Step 2b.
On our etracker e-learning platform, a free video provides a step-by-step guide to uploading conversions via the Data Manager.
Click here to go directly to the course:
https://academy.etracker.com/path-player?courseid=conversions-and-campaigns&unit=6abb7c7845d565895b0719e1Unit
To do this, sign in to Google Ads, select Tools → Data Manager → HTTP HTTPS from the menu bar, and click “+ Add“:
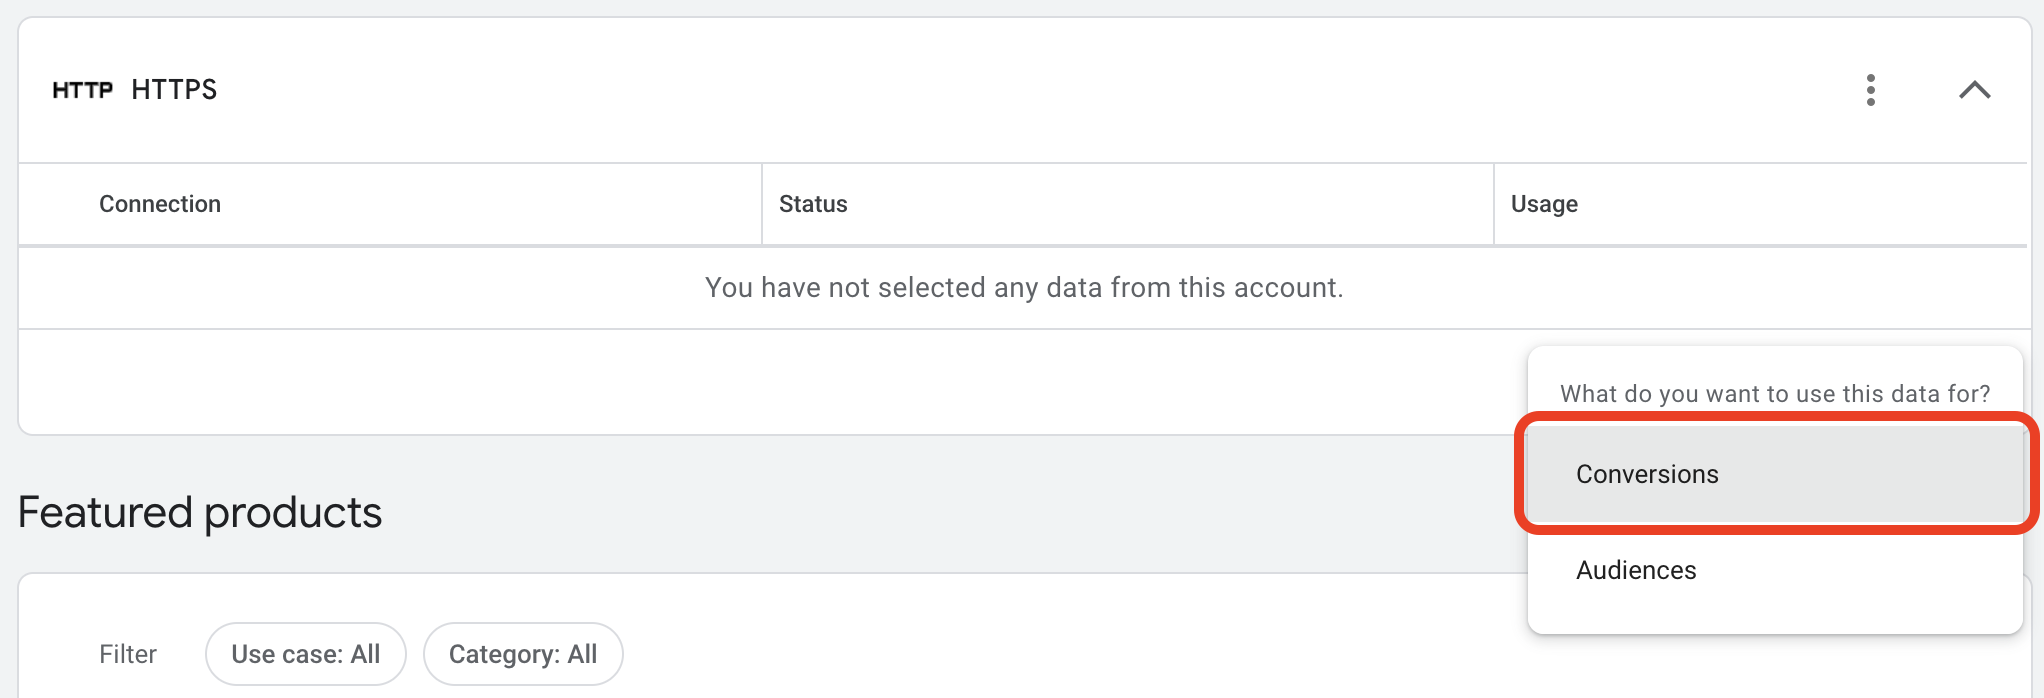
Under “What do you want to use this data for?”, select “Conversions”:
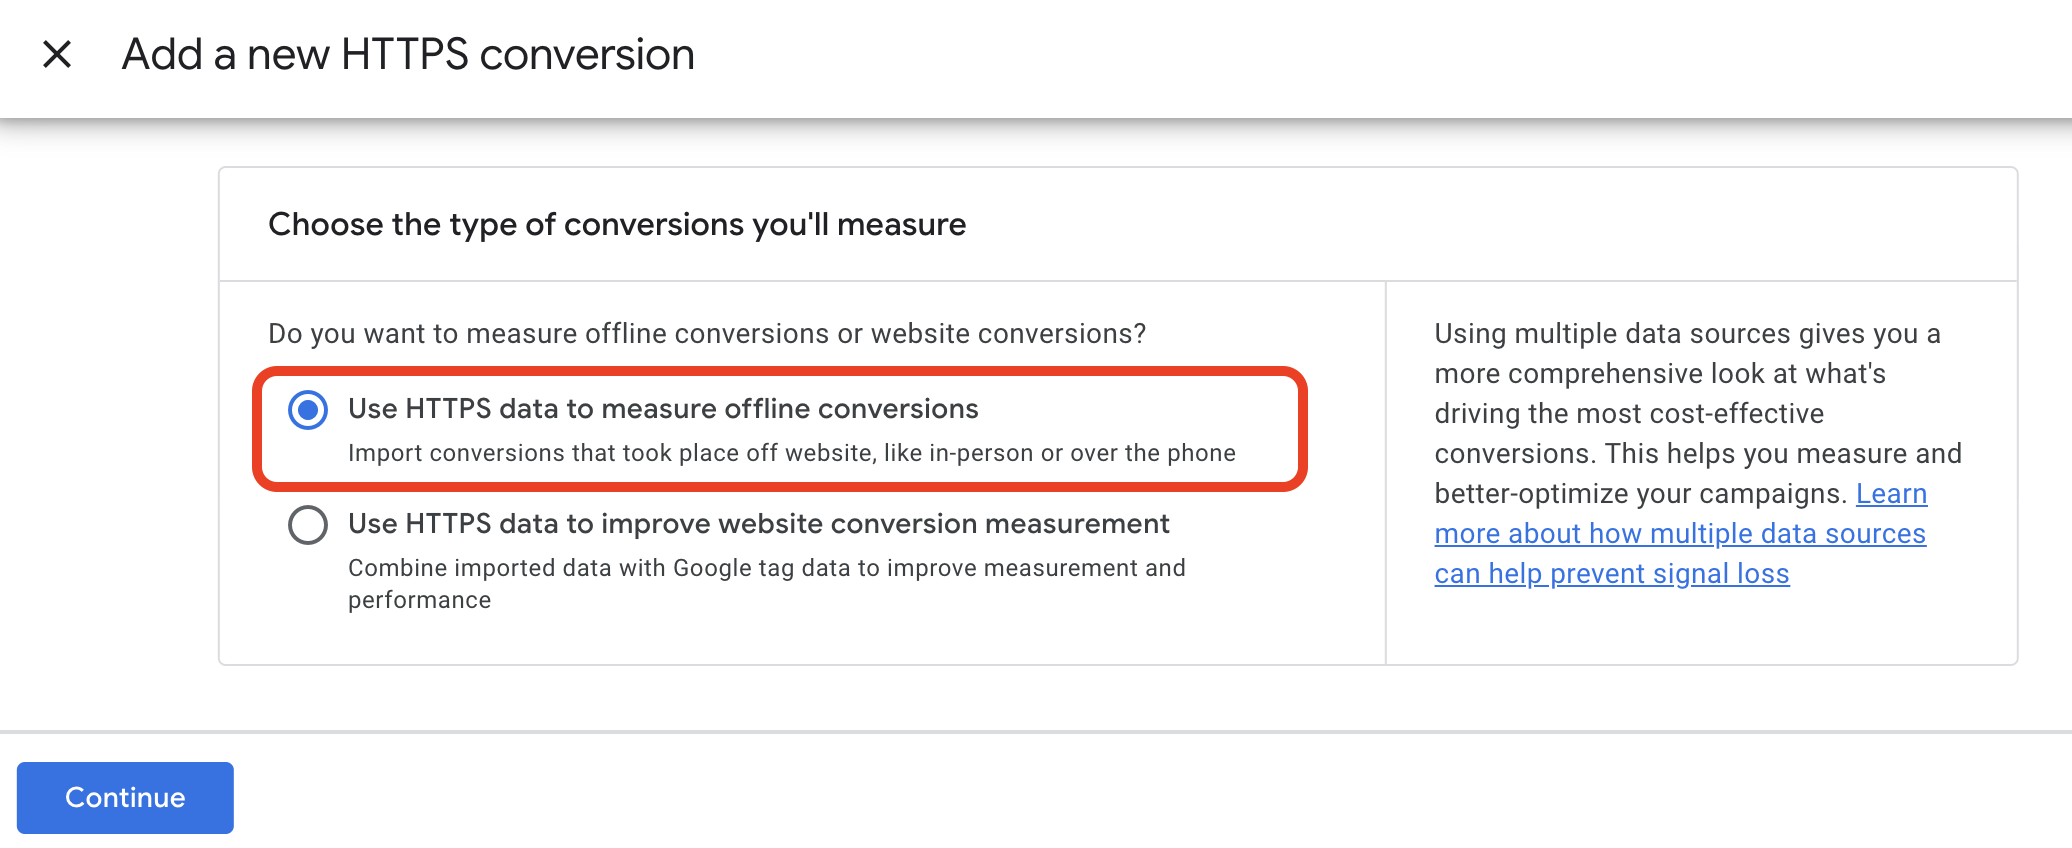
In the dialog box that opens, select “Use HTTPS data to analyze offline conversions,” even though our conversions are online conversions.
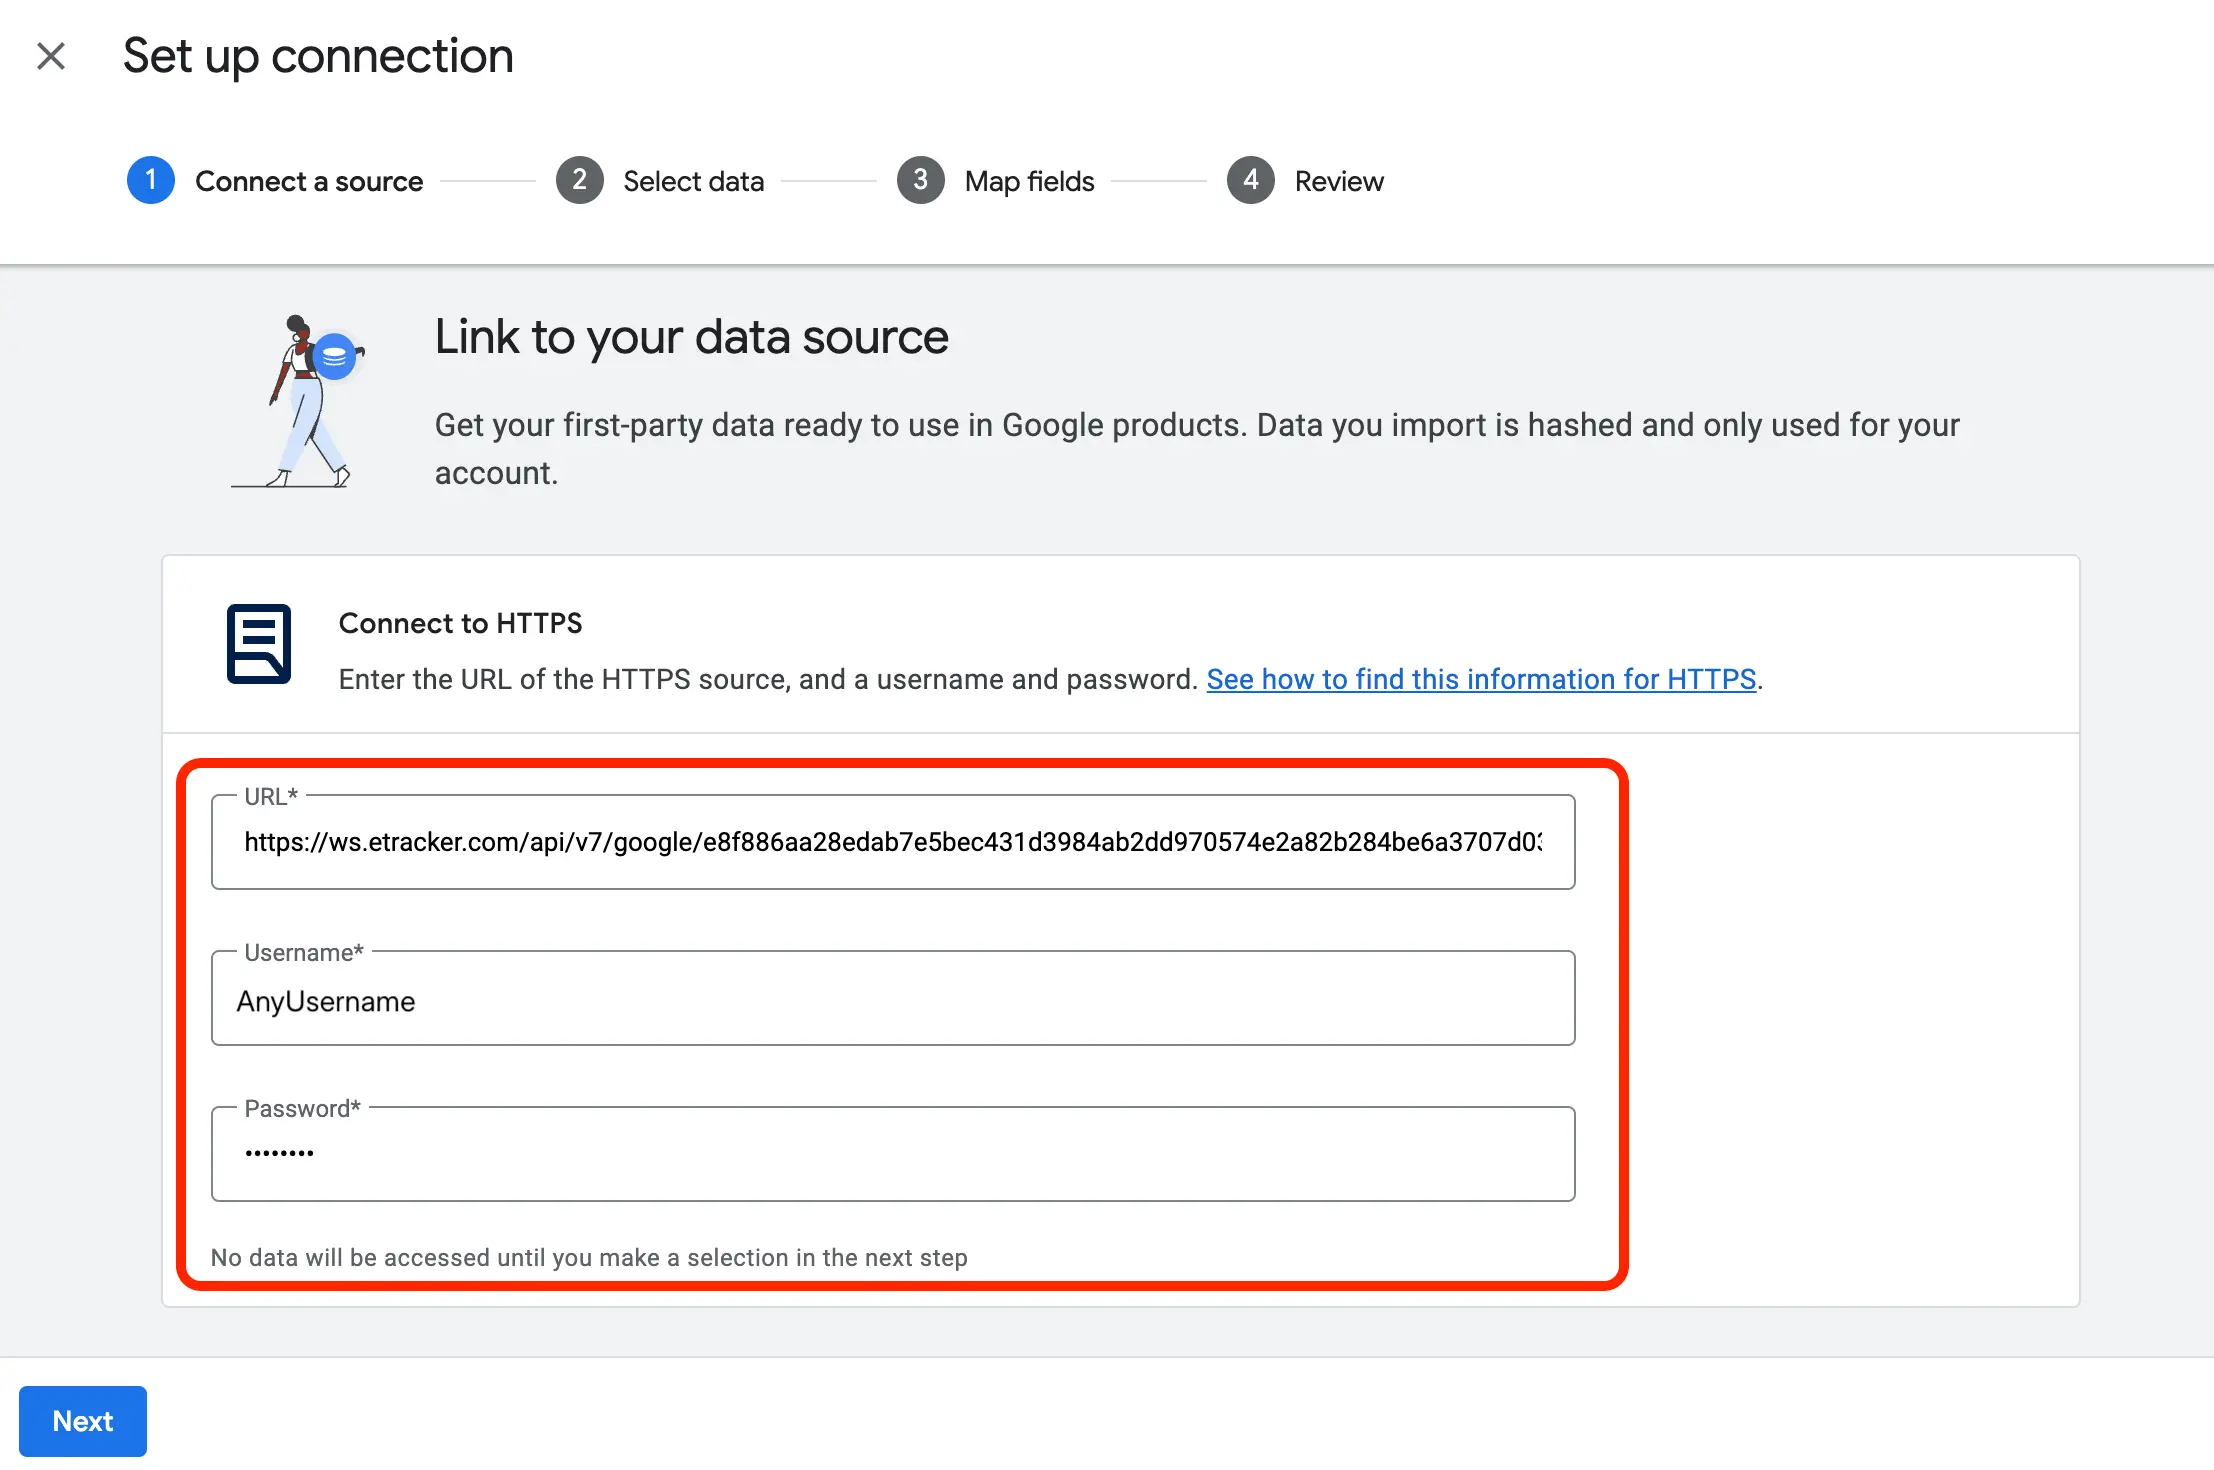
Next, enter the source URL—which contains the access token and was created in the Conversion Upload settings in etracker analytics—into the “URL” field. This ensures that only Google Ads can retrieve the data. Google Ads still expects a username and password. Simply enter any values you like. The source URL can be updated at any time in etracker analytics, but you’ll then need to re-enter it in Google Ads.
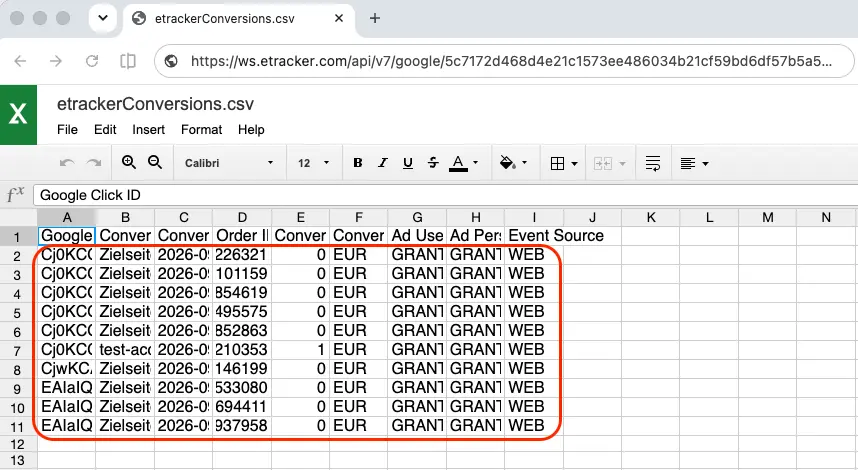
The uploaded CSV file must not be empty; it must contain at least one conversion. You can test this by opening the URL in your browser:
. If the file is empty, wait until conversions have occurred and the file has been regenerated (depending on the selected time interval).
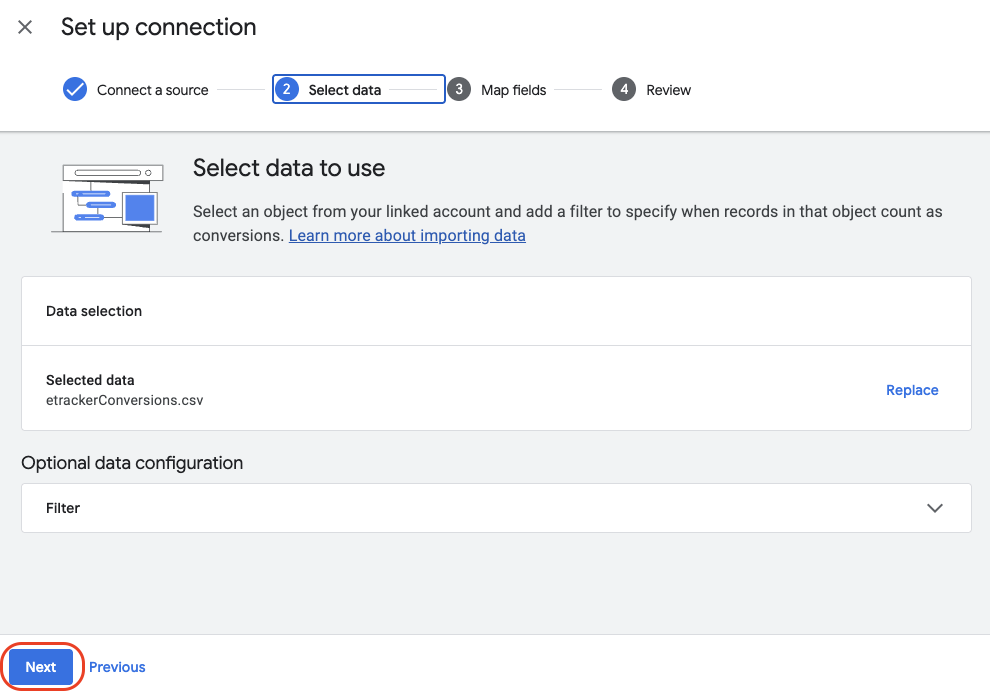
Just skip the next step (Select Data):
Next, the keys from the CSV file are mapped to the Google Ads keys. This happens automatically, so just keep clicking “Next.” Warnings will appear for some keys that do not exist. You can ignore these.
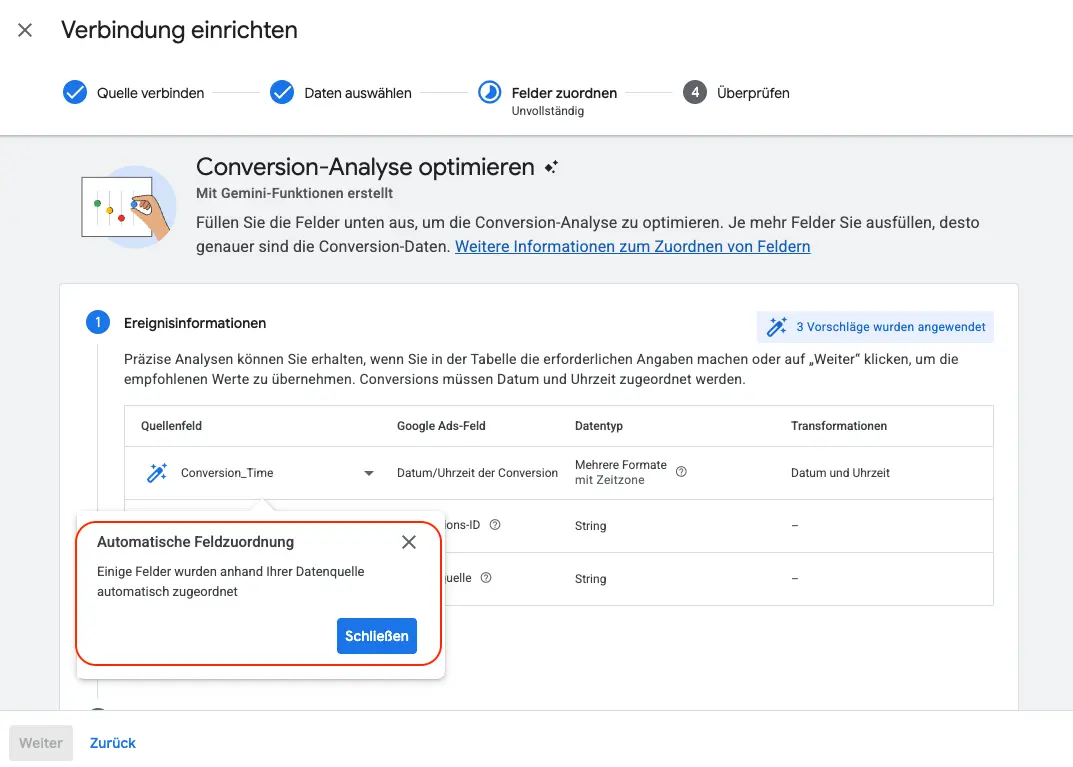
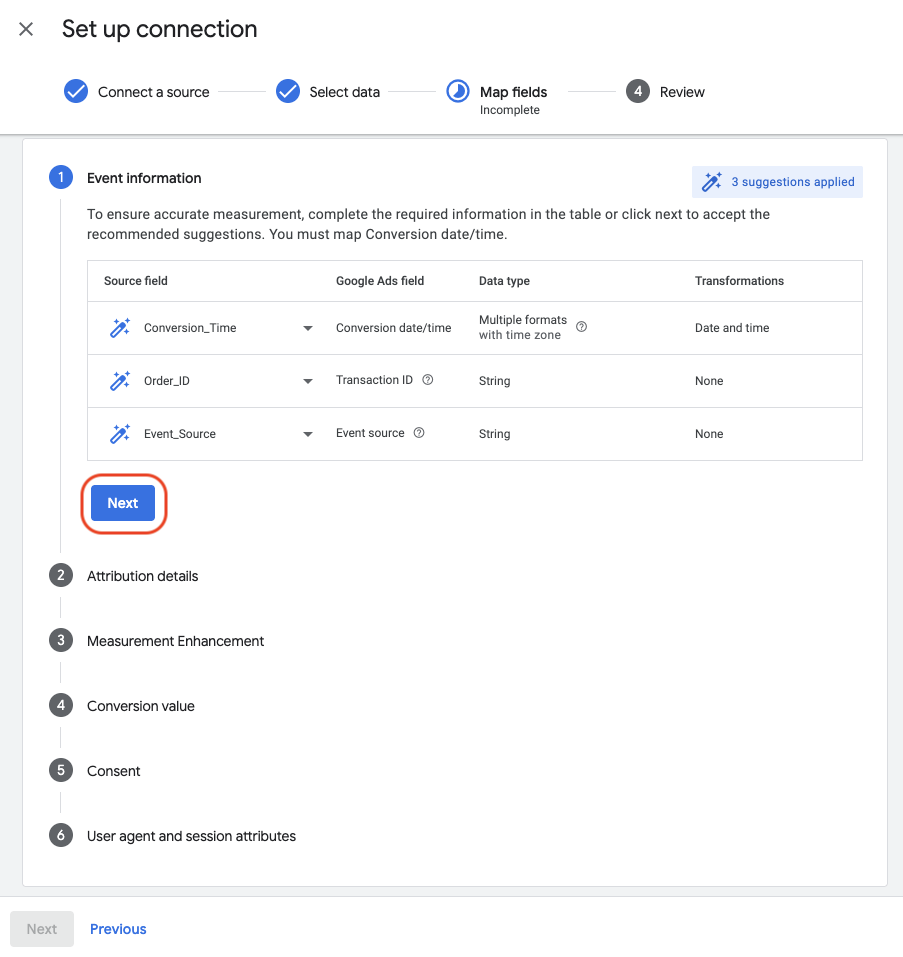
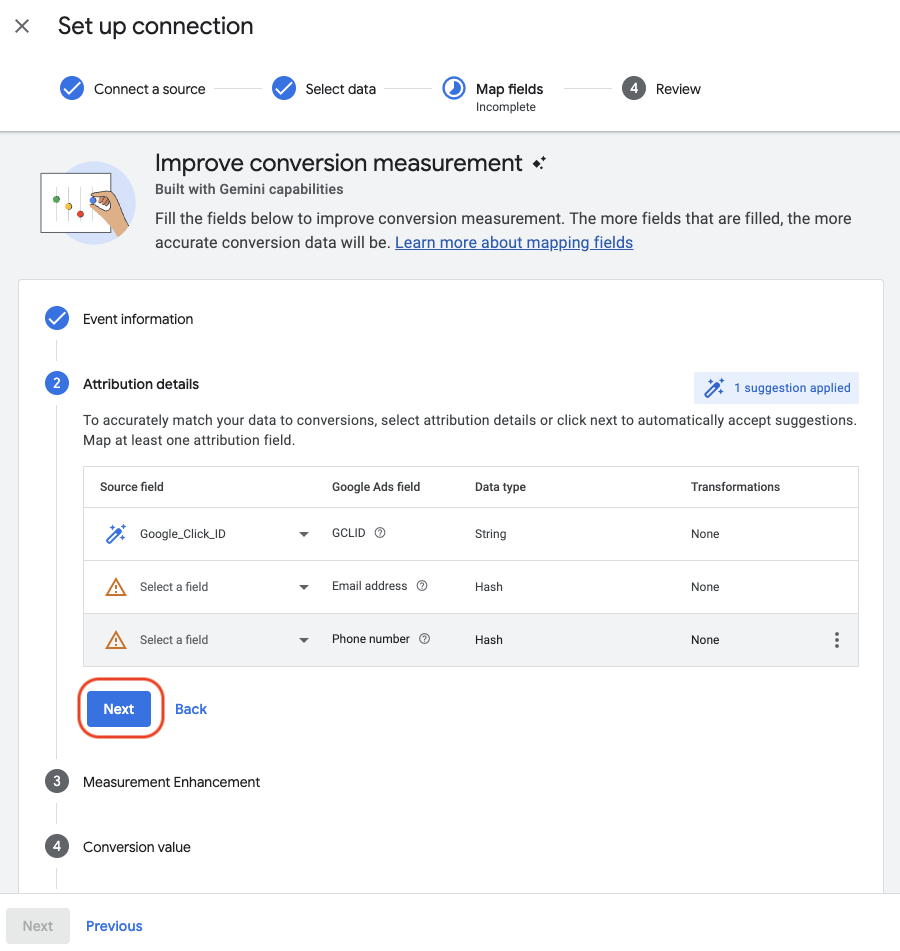
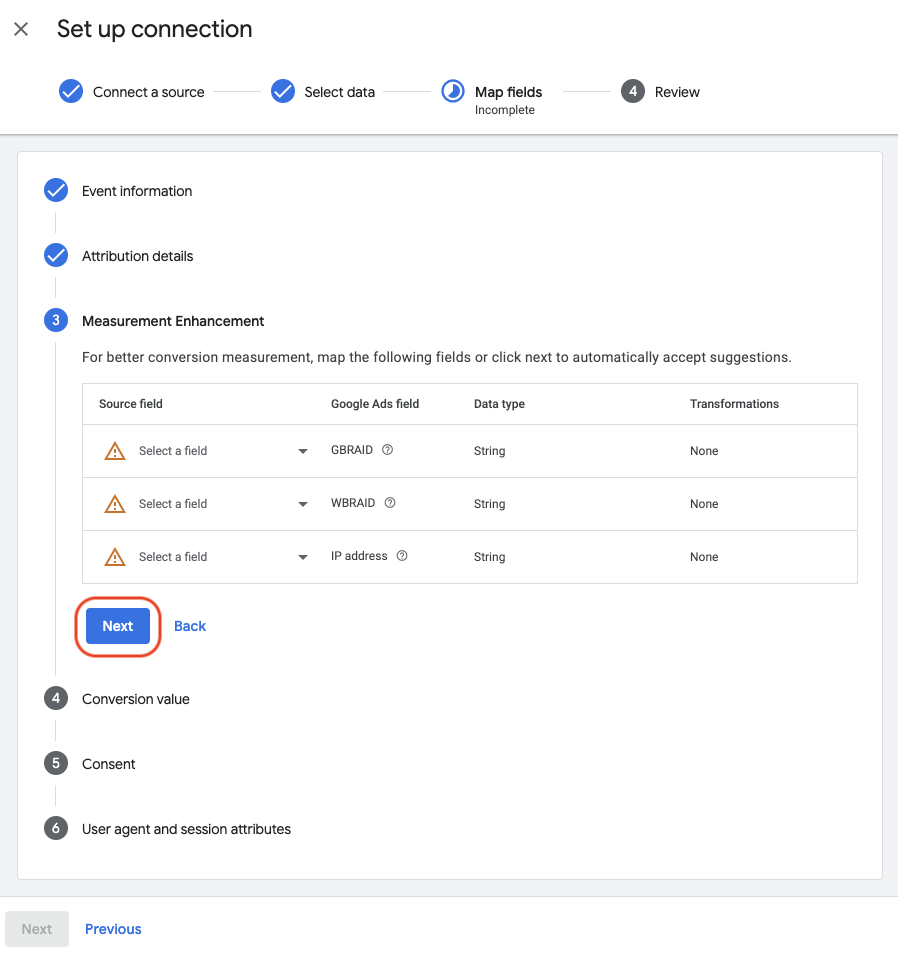
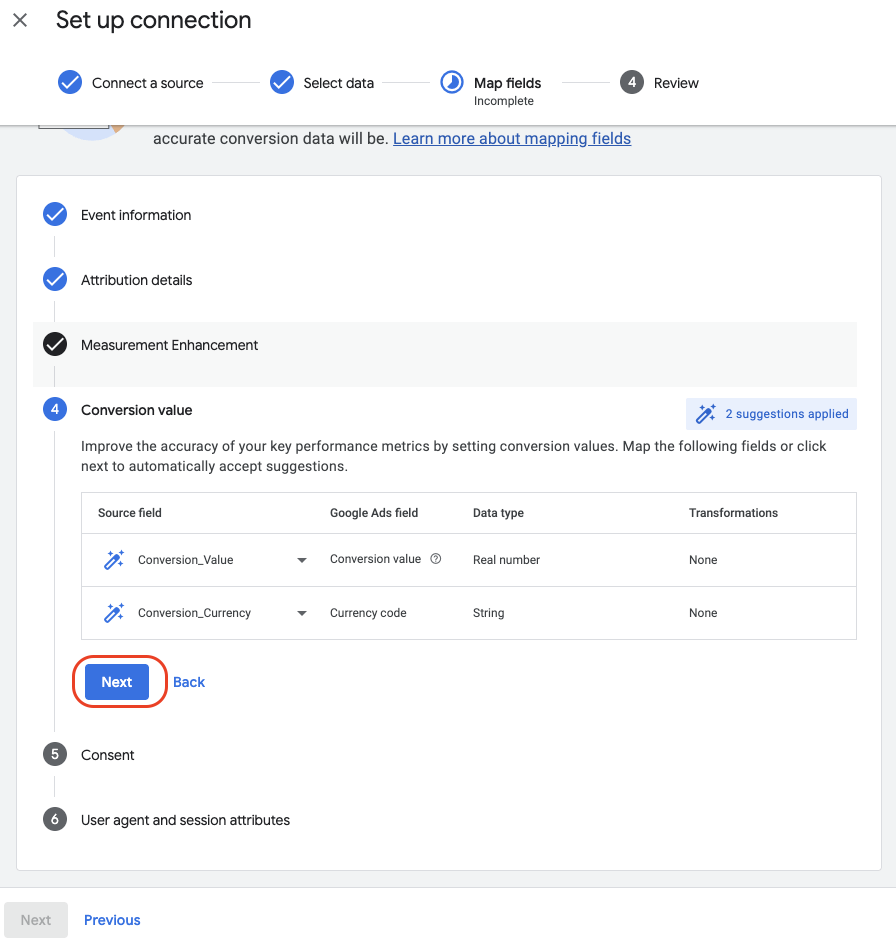
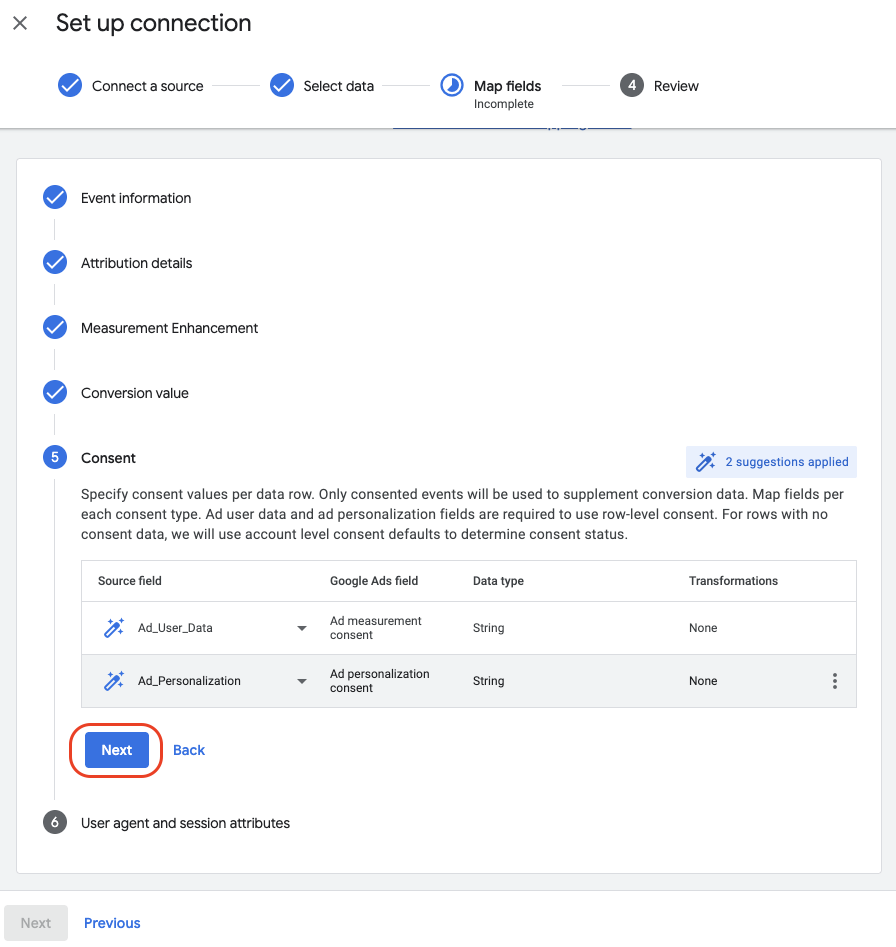
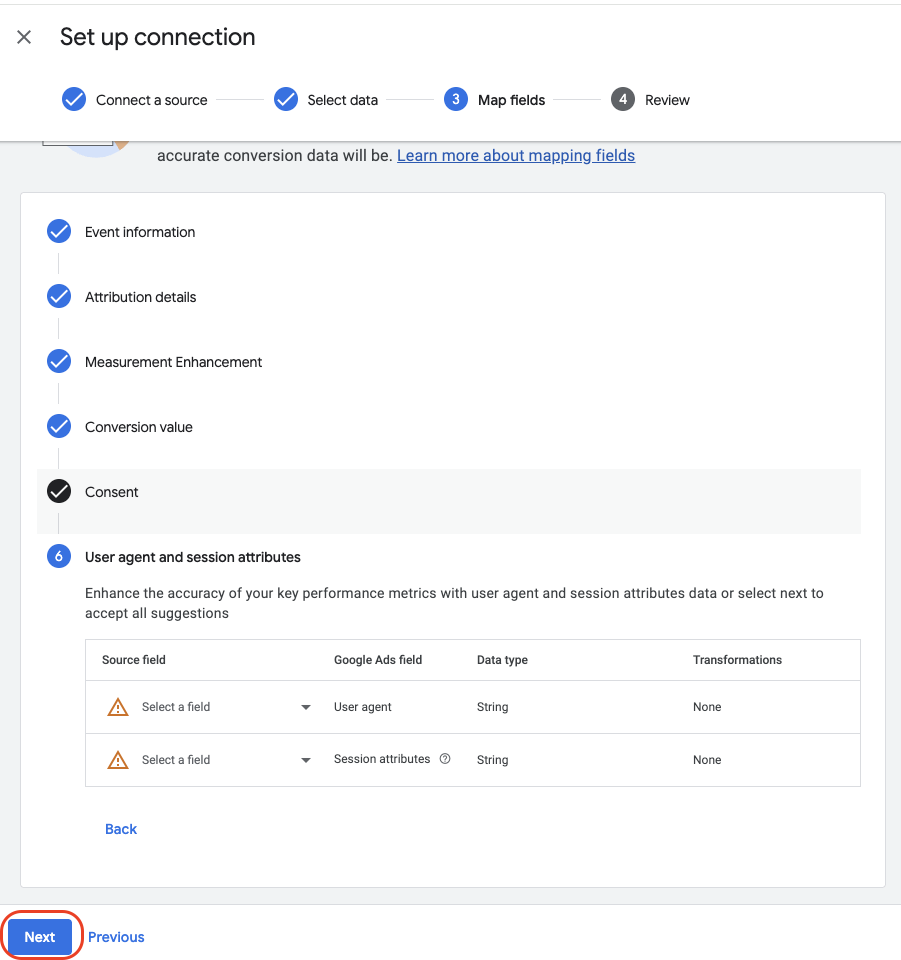
Now you’ll see the summary. Here, you can also specify how often and at what time the data should be retrieved from Google Ads.
The frequency of the upload in Google Ads must match the frequency that was selected when generating the source URL!
To ensure that all conversions from the previous day have been processed, we recommend setting the upload time to between 3:00 a.m. and 8:00 a.m.:
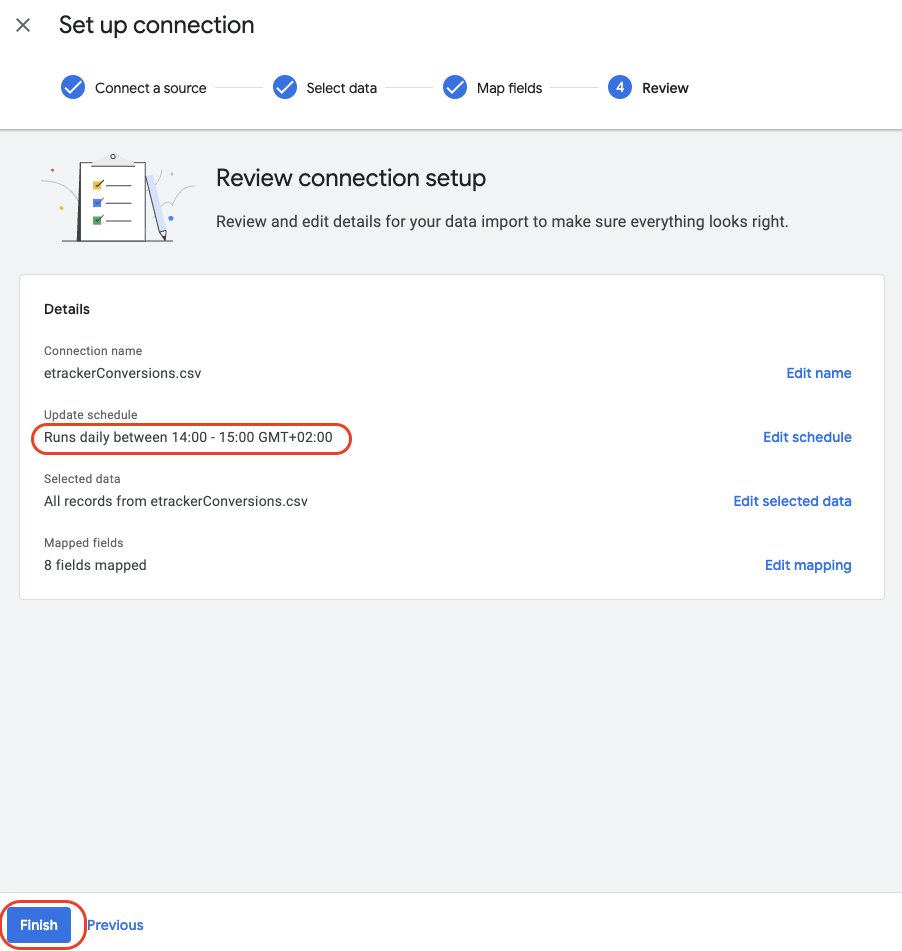
After clicking “Finish,” the connection is saved.
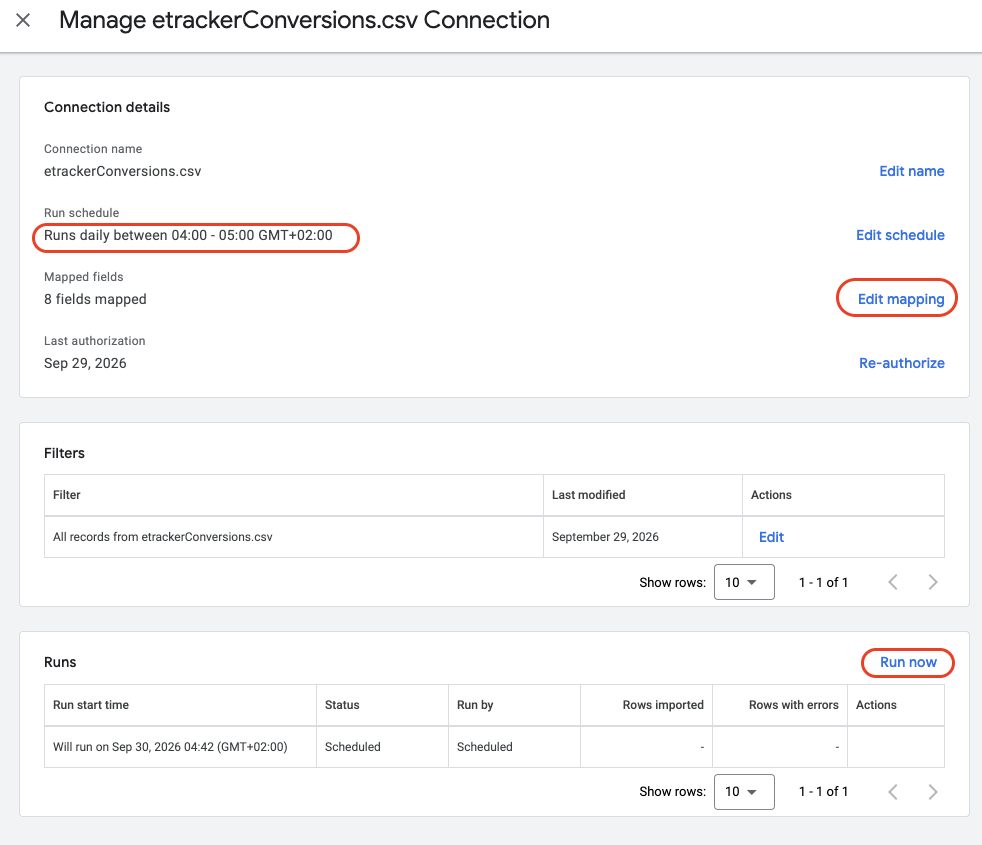
If you click on the entry, you can also review the individual settings and adjust them if necessary:

There, you’ll also have the option to trigger the upload manually so you don’t have to wait until the next day to check that everything has been processed correctly:
Now, in Step 3, we’ll continue with the setup in Google Ads.
Please note: The dialogs in Google Ads may differ slightly from the screenshots shown here, as Google is currently testing different variants and rolling out changes in stages.
Step 2b: Setting up conversion uploads in Google Ads (via Goals → Uploads → Schedules)
In new Google Ads accounts, Google no longer offers the option to set schedules for conversion uploads. The upload is then done via Data Manager. Please click here to skip to Step 2a.
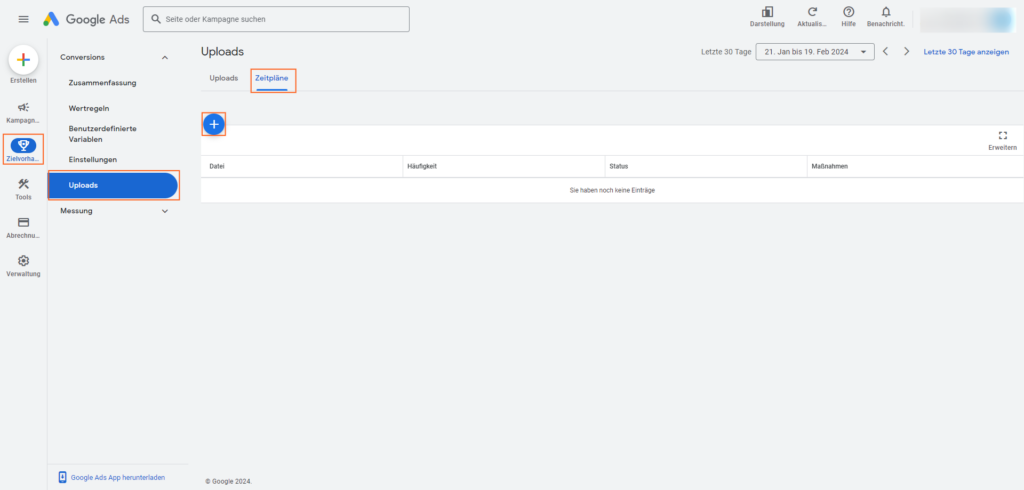
To do this, log in to Google Ads, select Target → Uploads → Schedules in the menu bar and click on the + symbol:
SelectHTTPSas the source and insert the source URL created in the upload settings in etracker analytics into the Source URL field:
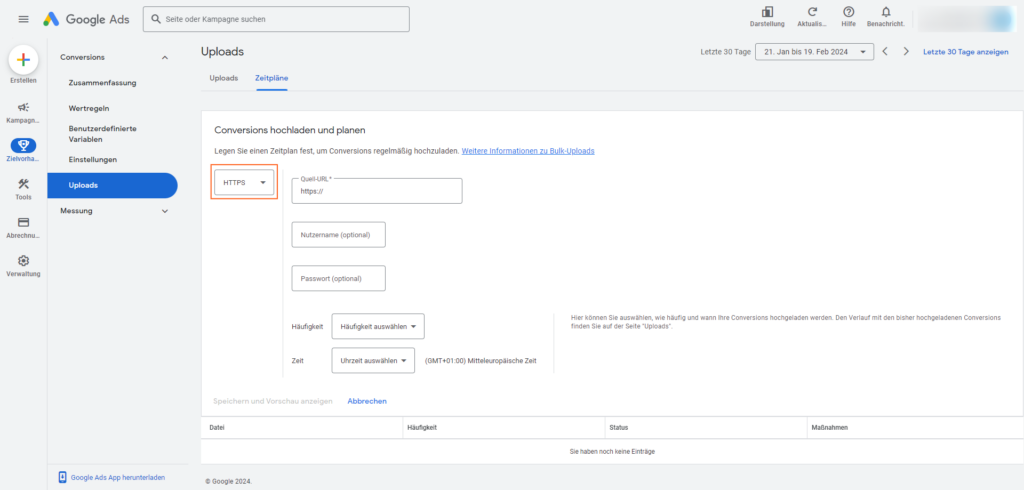
This ensures that only Google Ads can retrieve the data. The source URL can be renewed at any time in etracker analytics, but must then be re-entered in Google Ads.
Finally, set the frequency and time and then click on Save and show preview to save the schedule. Google Ads loads the data for the first time, displays a preview and starts the automatic upload.
The frequency of the upload in Google Ads must match the frequency that was selected when generating the source URL!
To ensure that all conversions from the previous day have been processed, we recommend setting a time between 3:00 am and 8:00 am for the upload.
Now, in Step 3, we’ll continue with the setup in Google Ads.
Please note: The dialogs in Google Ads may differ slightly from the screenshots shown here, as Google is currently testing different variants and rolling out changes in stages.
Step 3a: Set up conversion actions in Google Ads (New interface)
The following section explains how to set up conversion actions in the new Google Ads interface. If you’re still using the old interface in your account, please click here to skip to step 3b.
Click on the large+ Create icon and select Conversion action.
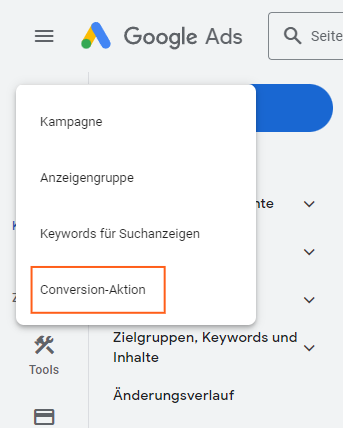
Select Conversions from offline activities in the overview and click on Add data source.
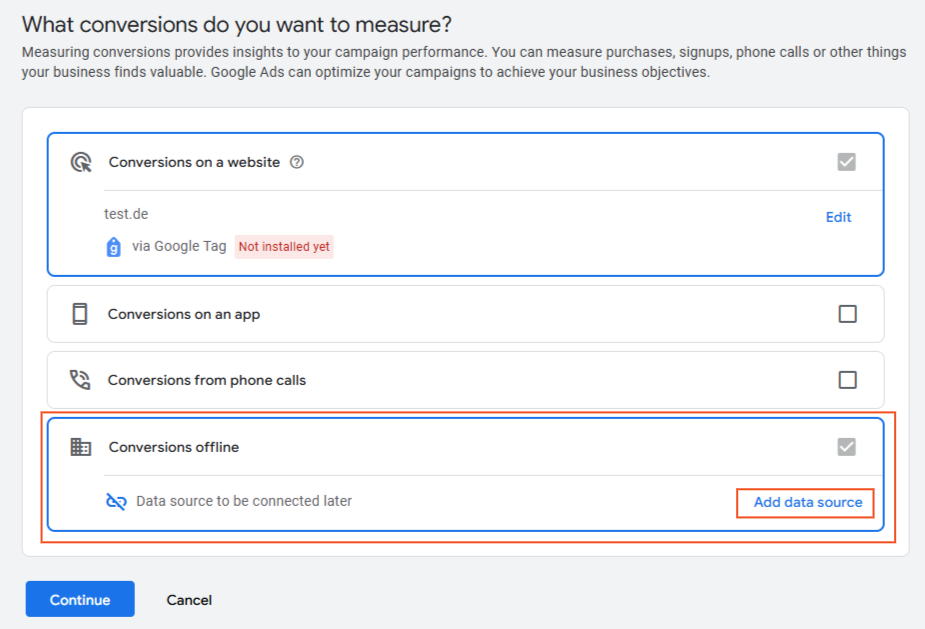
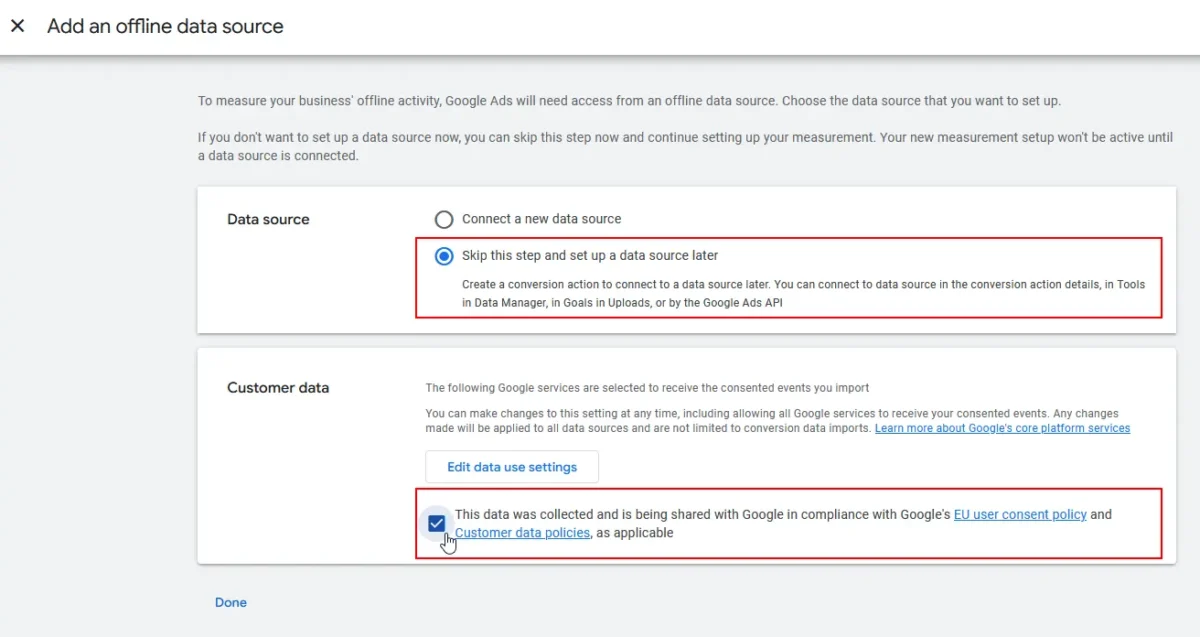
In the Add offline data source dialog box, select Skip this step and set up a data source later (the connection to the data source has already been established by setting up the upload from step 2) and confirm the corresponding release under Customer data.
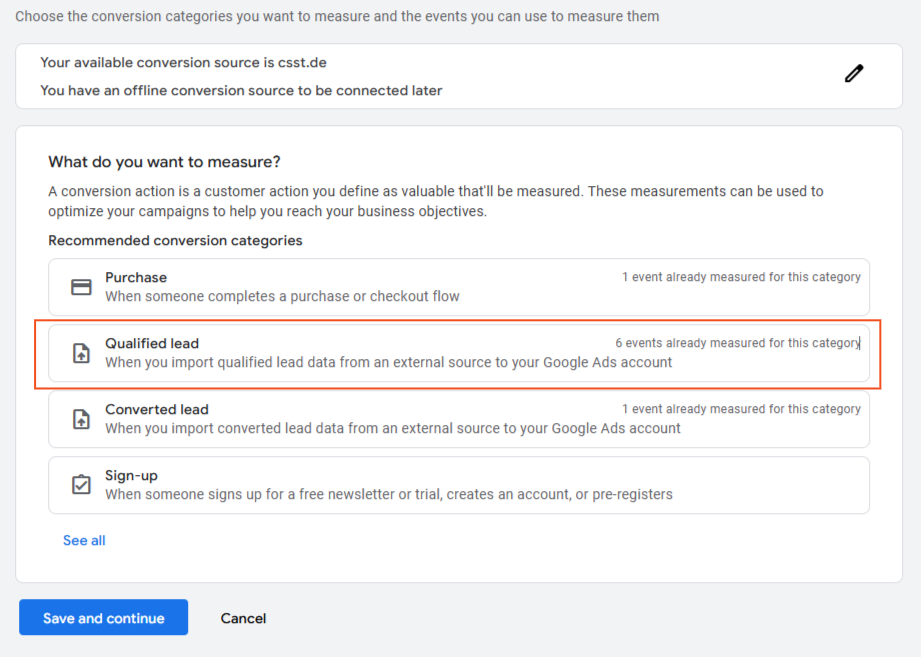
Now select the conversion category:
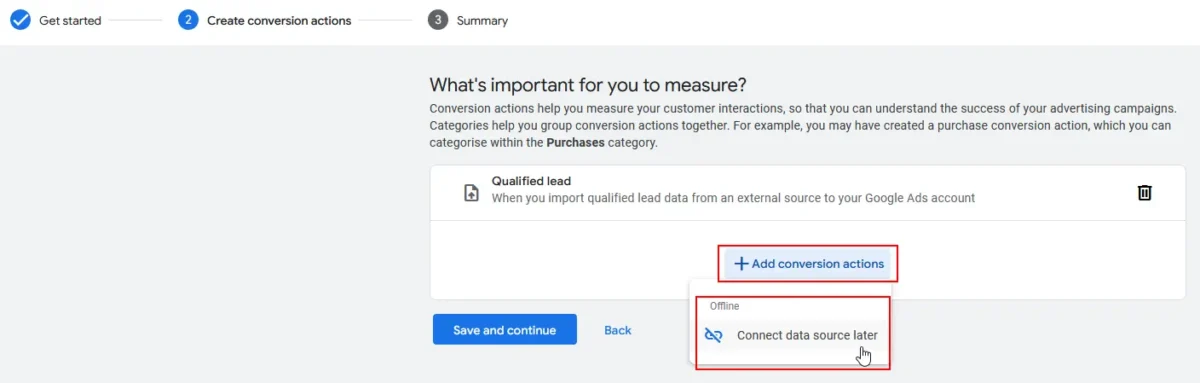
Then click on + Add conversion action and then on Connect to data source later:
Now configure the corresponding settings and click on Edit settings:
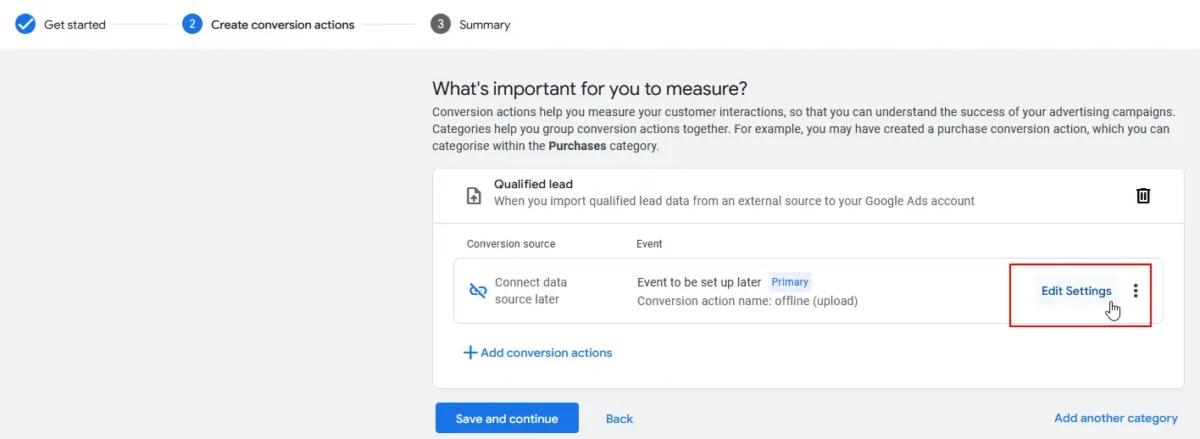
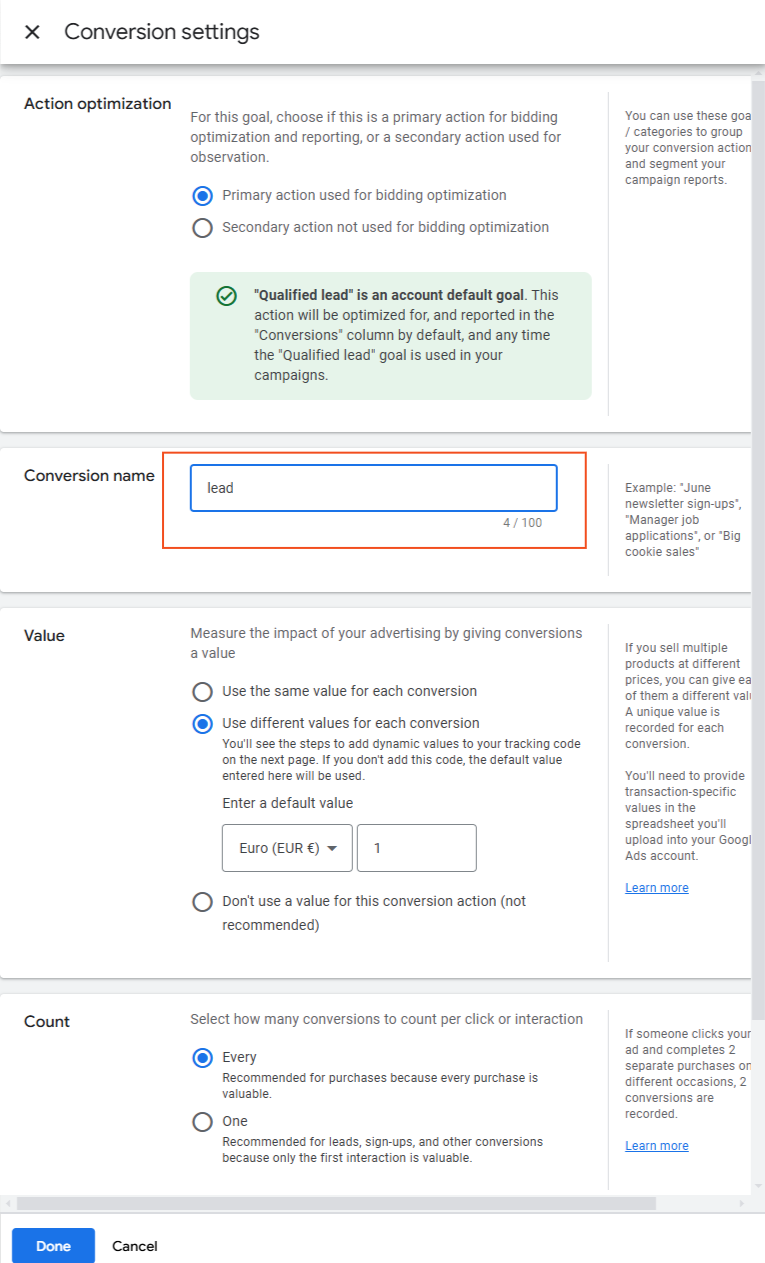
Now define the appropriate conversion target project and enter the conversion name in etracker analytics depending on the previous conversion selection:
- For orders:
lead - For purchases:
sale - Total for all destinations:
target_achievement - For selected goals: the name of the respective conversion as displayed under the Conversion name dimension.
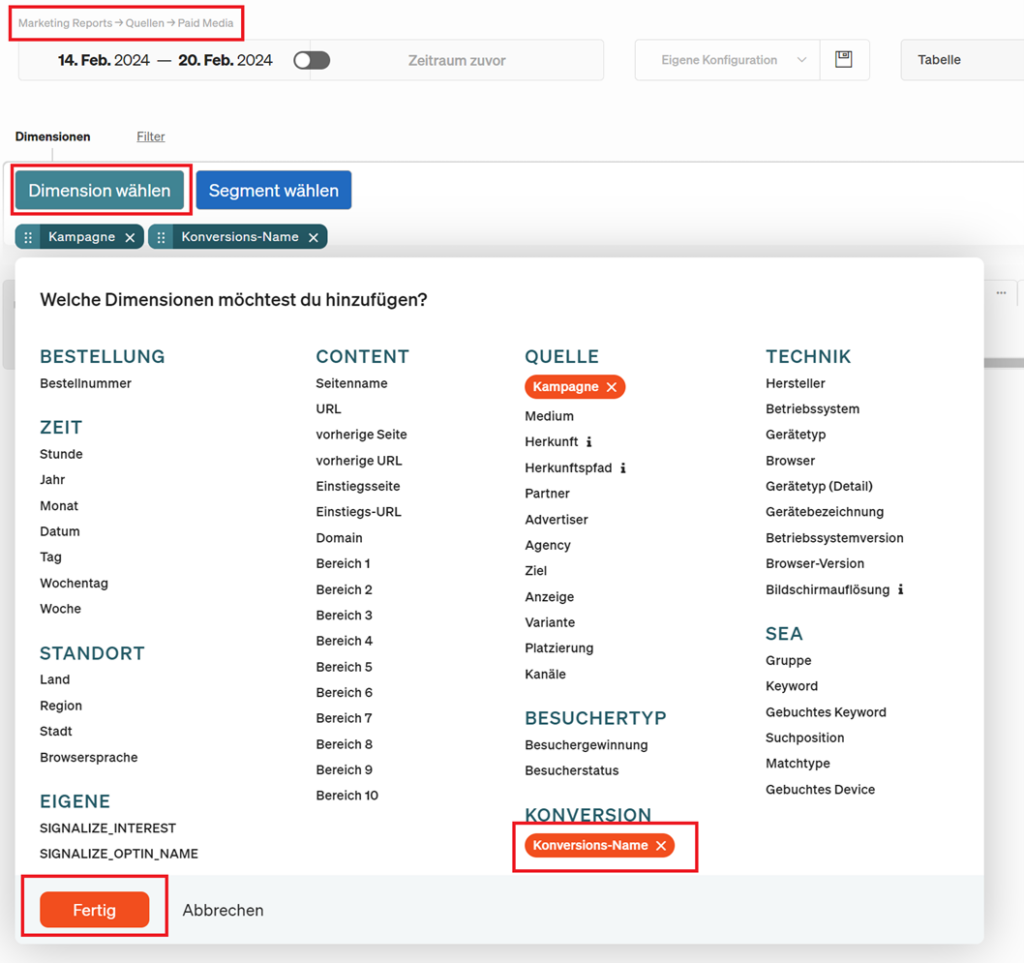
Please make sure to use the conversion name in exactly the right spelling.
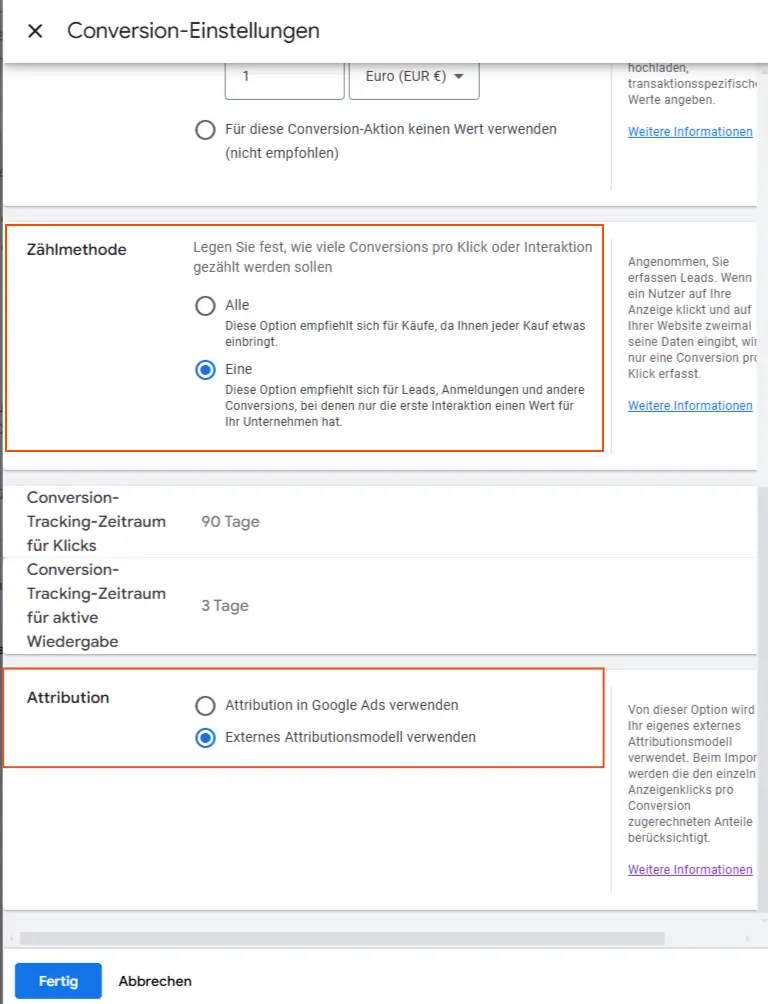
Select a tracking method (Counting only one conversion is particularly recommended for inquiries, sign-ups, and other leads. For purchases and bookings, however, we recommend the “All” option) and specify whether attribution should take place in Google Ads or whether the attribution from the etracker configuration (external attribution model) should be used.
As a rule, it is recommended to use the attribution of etracker analytics, i.e. the external attribution model for Google Ads. If you have selected the attribution model in Google Ads in the conversion upload configuration of etracker analytics, click on Use attribution in Google Ads in the Google Ads settings(more information).
The data-driven Google Ads model requires at least 3,000 Google Ads clicks and 600 resulting conversions within 30 days.
Optional: If a further step with the method for measuring offline conversions is displayed when creating a conversion action, select Google Click Identifier:

Carry out the steps for all conversion actions that are to be transferred!
Once all conversion actions to be taken into account have been created, the conversion upload setup is complete.
Please note this important information if you record conversions on the website in parallel using etracker analytics and Google Analytics or the Google Conversion Tag.
If conversions from multiple sources are sent to Google Ads, care must be taken to ensure that the same conversions are not mistakenly counted multiple times. To prevent this, it is recommended to use the One conversion counting method in Google Ads, whereby a maximum of one conversion per ad click is counted. It must also be ensured that it relates to the same conversion action. If the same conversion is sent from multiple sources, but each with a different name, Google cannot deduplicate or clean it up. If conversions are uploaded multiple times from etracker to Google Ads, this is not a problem, as in this case the click ID, conversion name and conversion time match. If all three parameters match, the conversion is only counted once, regardless of the counting method One conversion or Every conversion.
Step 3b: Set up conversion actions in Google Ads (Old interface)
The following shows how to store conversion actions in the old Google Ads interface. If you find the new interface in your account, please click here.
Click on the large+ Create symbol and select the Conversion action item.
Click on Import on the right and then select these settings before clicking on Next .
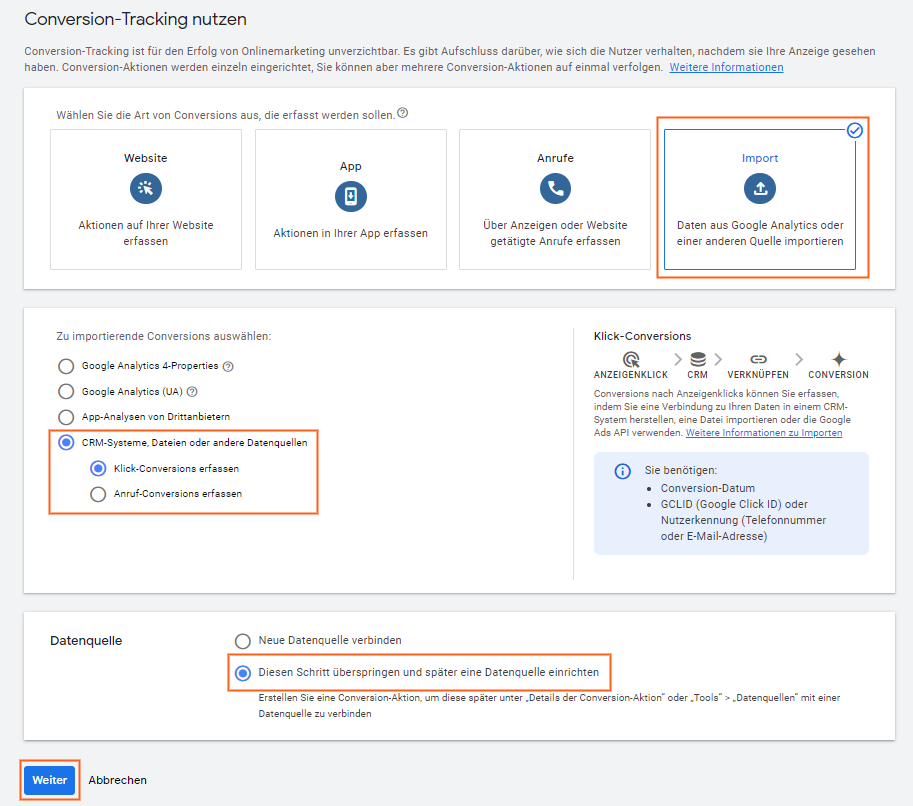
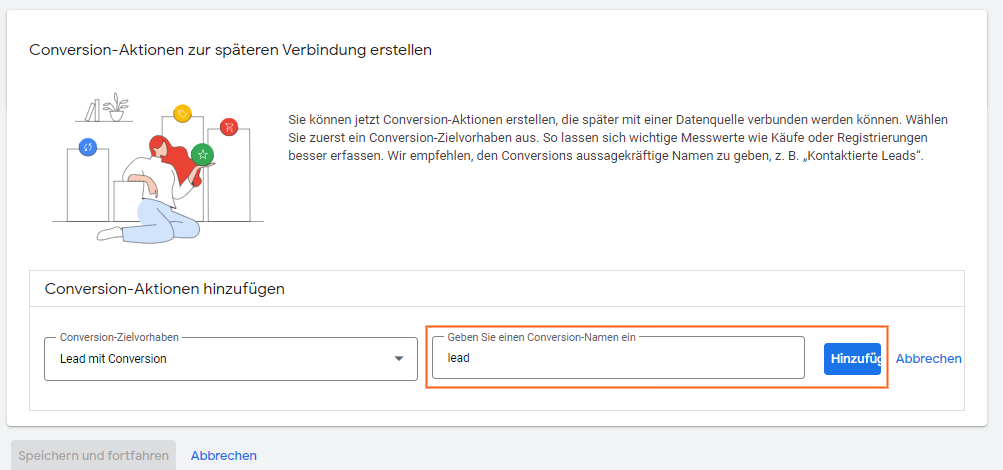
Now define the appropriate conversion target project and enter the conversion name in etracker analytics depending on the previous conversion selection:
- For orders: lead
- For purchases: sale
- For all targets in total: target_achievement
- For selected goals: the name of the respective conversion as displayed under the Conversion name dimension.
Please make sure to use the conversion name in exactly the right spelling.
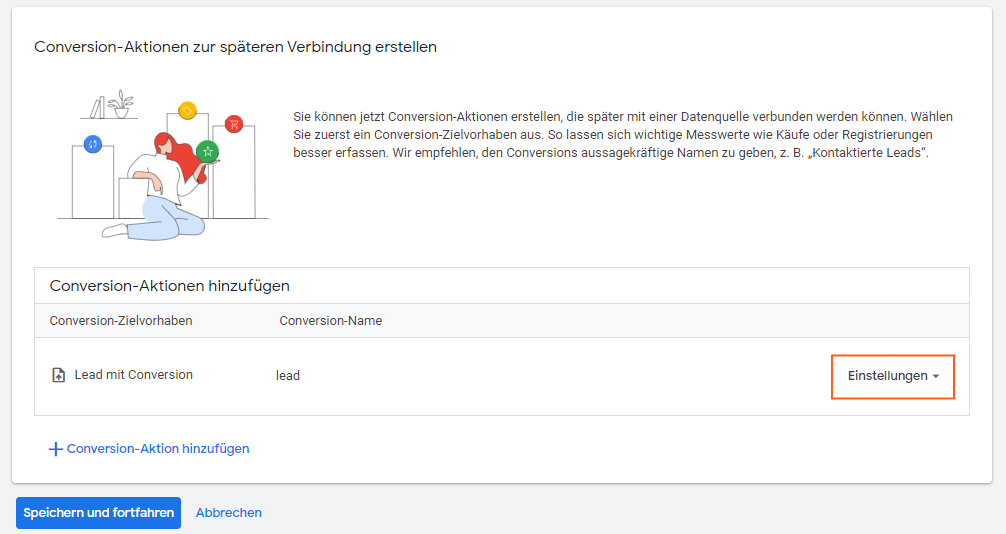
Configure the associated settings by selecting Settings and then Settings for the conversion action:
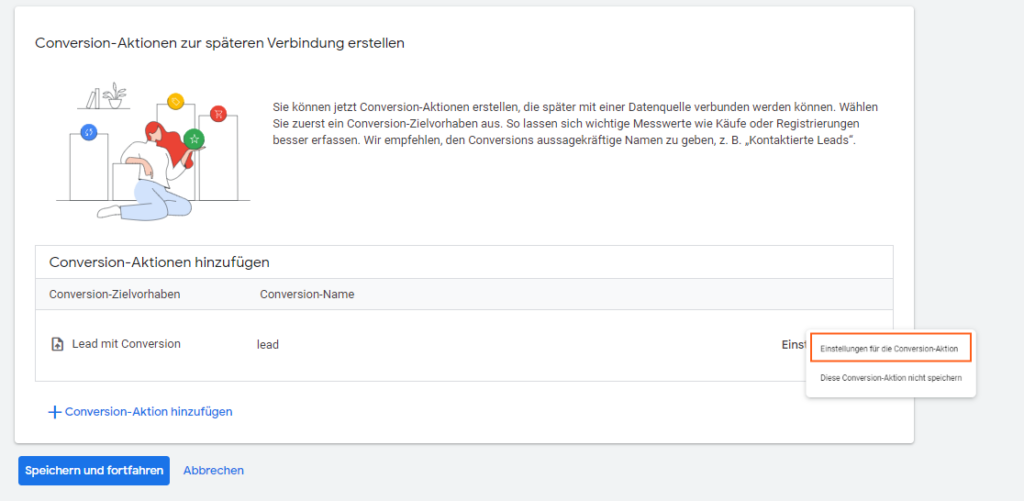
Select the appropriate counting method as previously set in etracker analytics and the desired attribution model:
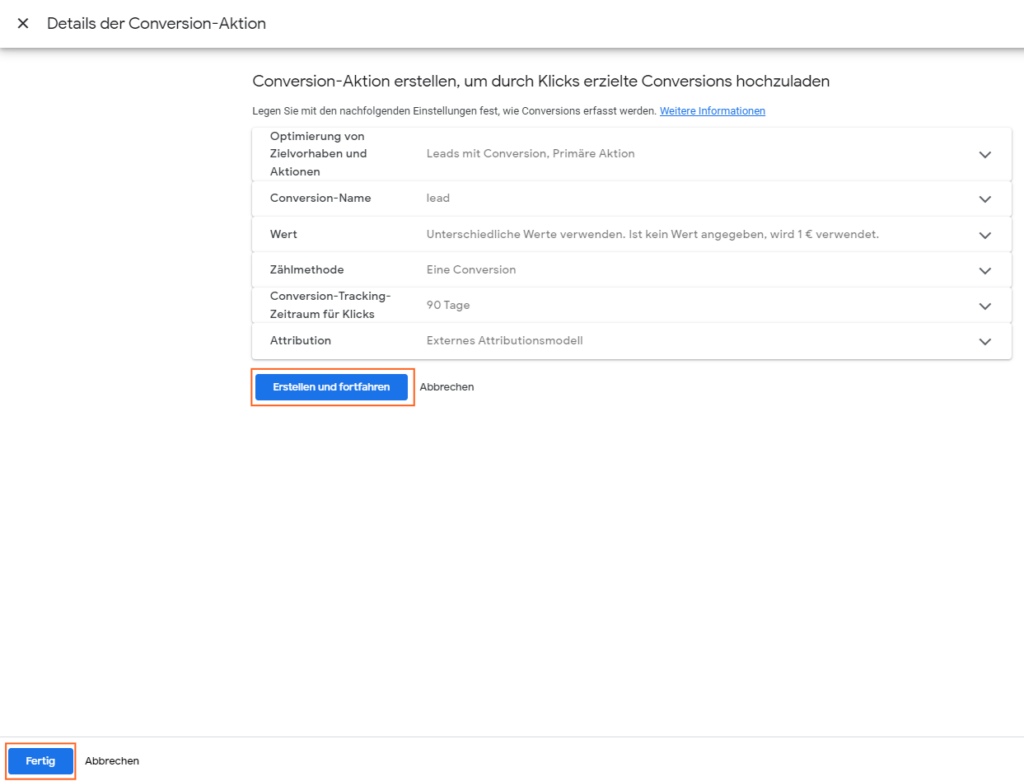
As a rule, it is recommended to use the attribution of etracker analytics, i.e. the external attribution model for Google Ads. If you have selected the attribution model in Google Ads in the conversion upload configuration of etracker analytics, select data-driven attribution in the Google Ads settings(more information).
Please note that the data-driven Google Ads model requires at least 3,000 Google Ad clicks and 600 resulting conversions within 30 days. Optional: If a further step with the method for measuring offline conversions is displayed when creating a conversion action, select Google Click Identifier:
Carry out the steps for all conversion actions that are to be transferred! Once all conversion actions to be taken into account have been created, the conversion upload setup is complete.
Please note this important information if you record conversions on the website in parallel using etracker analytics and Google Analytics or the Google Conversion Tag.
If conversions from multiple sources are sent to Google Ads, care must be taken to ensure that the same conversions are not mistakenly counted multiple times. To prevent this, it is recommended to use the One conversion counting method in Google Ads, whereby a maximum of one conversion per ad click is counted. It must also be ensured that it relates to the same conversion action. If the same conversion is sent from multiple sources, but each with a different name, Google cannot deduplicate or clean it up. If conversions are uploaded multiple times from etracker to Google Ads, this is not a problem, as in this case the click ID, conversion name and conversion time match. If all three parameters match, the conversion is only counted once, regardless of the counting method One conversion or Every conversion.
If you see an older Google Ads interface, then the following applies:
Setting up the conversion upload in Google Ads
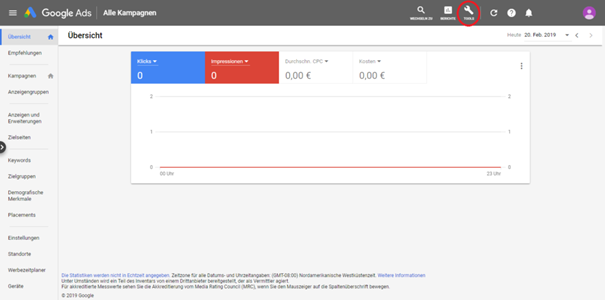
To do this, log in to Google Ads and then click onTools in the menu bar:
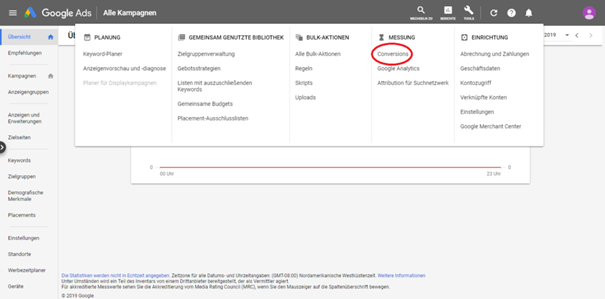
Go to Conversions under Measurement:
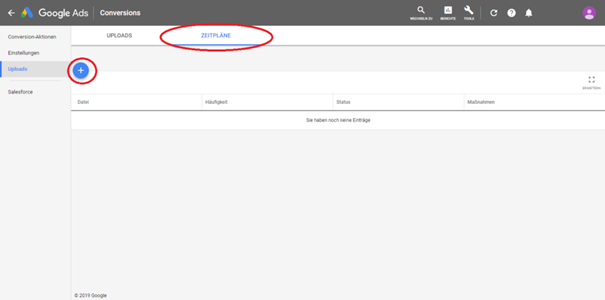
For time-controlled uploads, click onSchedulesand set up a new schedule by clicking on the+ symbol:
SelectHTTPSas the source and insert the source URL created in the upload settings in etracker analytics into theSource URLfield:
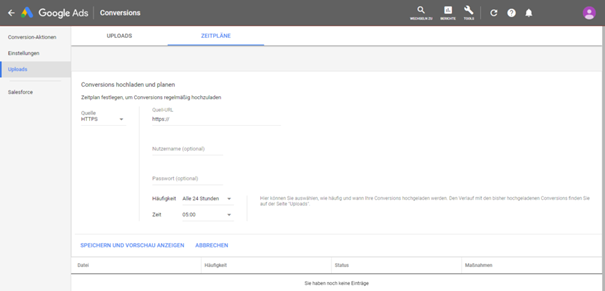
This ensures that only Google Ads can retrieve the data. The source URL can be renewed at any time in etracker analytics, but must then be re-entered in Google Ads.
Finally, set the frequency and time and then click onSave and show preview to save the schedule. Google Ads loads the data for the first time, displays a preview and starts the automatic upload.
The frequency of the upload in Google Ads must match the frequency that was selected when generating the source URL.
To ensure that all conversions from the previous day have been processed, we recommend setting a time between 3:00 am and 8:00 am for the upload.
Store conversion actions in Google Ads
Finally, the conversion campaigns are created in Google Ads. To do this, go toTools → Conversions → Conversion actionsand click on the+ symbol.
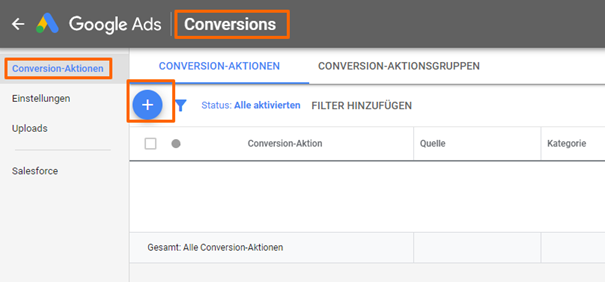
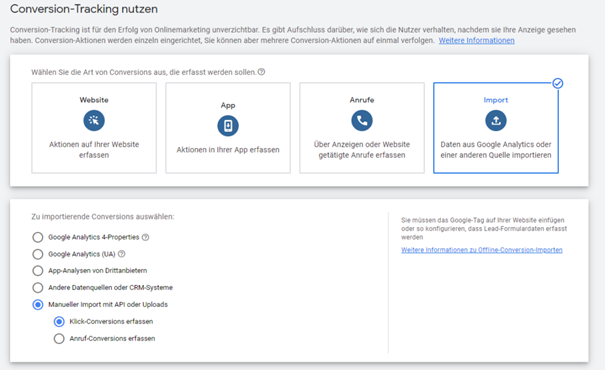
UnderImport, selectManual import with API or Uploads or Other data sources or CRM systems followed byRecord click conversions.
Now define the appropriate category for you (e.g. qualified lead) and enter depending on the conversion selection:
- For orders: lead
- For purchases: sale
- For all targets in total: target_achievement
- For selected targets: the name of the respective target process as shown under Basic Reports → Content → Conversion processes.
Please make sure to use the action names in exactly the right spelling.
Carry out the steps for all conversion actions that are to be transferred and fill in the other fields according to the instructions:
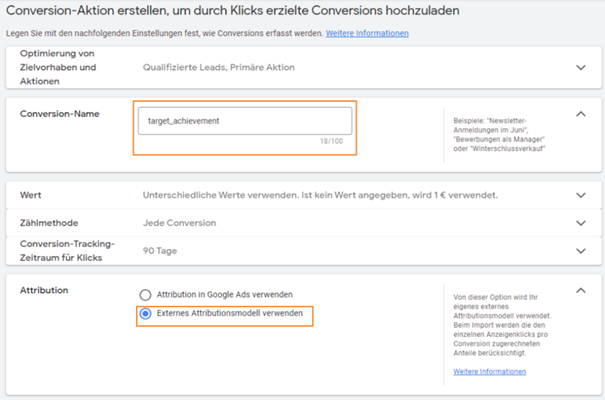
Once all conversion actions to be taken into account have been created, the conversion upload setup is complete. Optional: If a further step with the method for measuring offline conversions is displayed when creating a conversion action, select Google Click Identifier:
Please note this important information if you record conversions on the website in parallel using etracker analytics and Google Analytics or the Google Conversion Tag.
If conversions from multiple sources are sent to Google Ads, care must be taken to ensure that the same conversions are not mistakenly counted multiple times. To prevent this, it is recommended to use the One conversion counting method in Google Ads, whereby a maximum of one conversion per ad click is counted. It must also be ensured that it relates to the same conversion action. If the same conversion is sent from multiple sources, but each with a different name, Google cannot deduplicate or clean it up. If conversions are uploaded multiple times from etracker to Google Ads, this is not a problem, as in this case the click ID, conversion name and conversion time match. If all three parameters match, the conversion is only counted once, regardless of the counting method One conversion or Every conversion.