OpenAI (ChatGPT) Ads Connector
Introduction
Below, we’ll show you how to set up campaign tracking for OpenAI Ads (ads in ChatGPT) and how to enable the automatic transmission of conversion data to OpenAI.
Automatically uploading conversion data to OpenAI allows you to,
- View your campaigns’ conversions and revenue directly in OpenAI Ads Manager, so you can manage your campaigns entirely from there.
- Use conversions and revenue to optimize your campaigns in OpenAI Ads.
Prerequisites:
- JustRelate etracker Pro or Enterprise Edition with administrative privileges
- Access to OpenAI Ads Manager
- Conversion actions are set up in etracker analytics – either as orders (leads), purchases (sales), target achievements (in conversion processes) or tag manager conversions
To gather as much conversion data as possible for optimization, we recommend combining server-side uploads with the OpenAI Conversion Tag. This requires that the same conversions be recognized as identical and not counted multiple times. Therefore, be sure to follow the instructions on deduplication in the etracker section if you are tracking conversions in parallel using etracker analytics and the OpenAI pixel.
The facility consists of these points:
- OpenAI: Setting up the OpenAI Ads Conversion Upload.
- OpenAI: Setting up OpenAI Ads campaign tracking.
- Optional (recommended): etracker: Setting up the OpenAI Conversion Tag.
- Check the transfer in OpenAI Ads Manager.
To optimize the measurement accuracy of your OpenAI Ads despite the increasing restrictions on traditional cookie and URL parameter tracking, etracker supports the use of Enhanced Conversions —both for conversion uploads and the OpenAI Conversion Tag. Activation is done by using the corresponding“User-provided data”variables. Be sure to comply with the legal requirements and make the necessary consent adjustments.
OpenAI: Setting Up Conversion Uploads
Step 1: Setting Up a Data Source (Pixel)
Log in to OpenAI Ads Manager and go to OpenAI Ads Manager → Conversions. Create a new data source there.
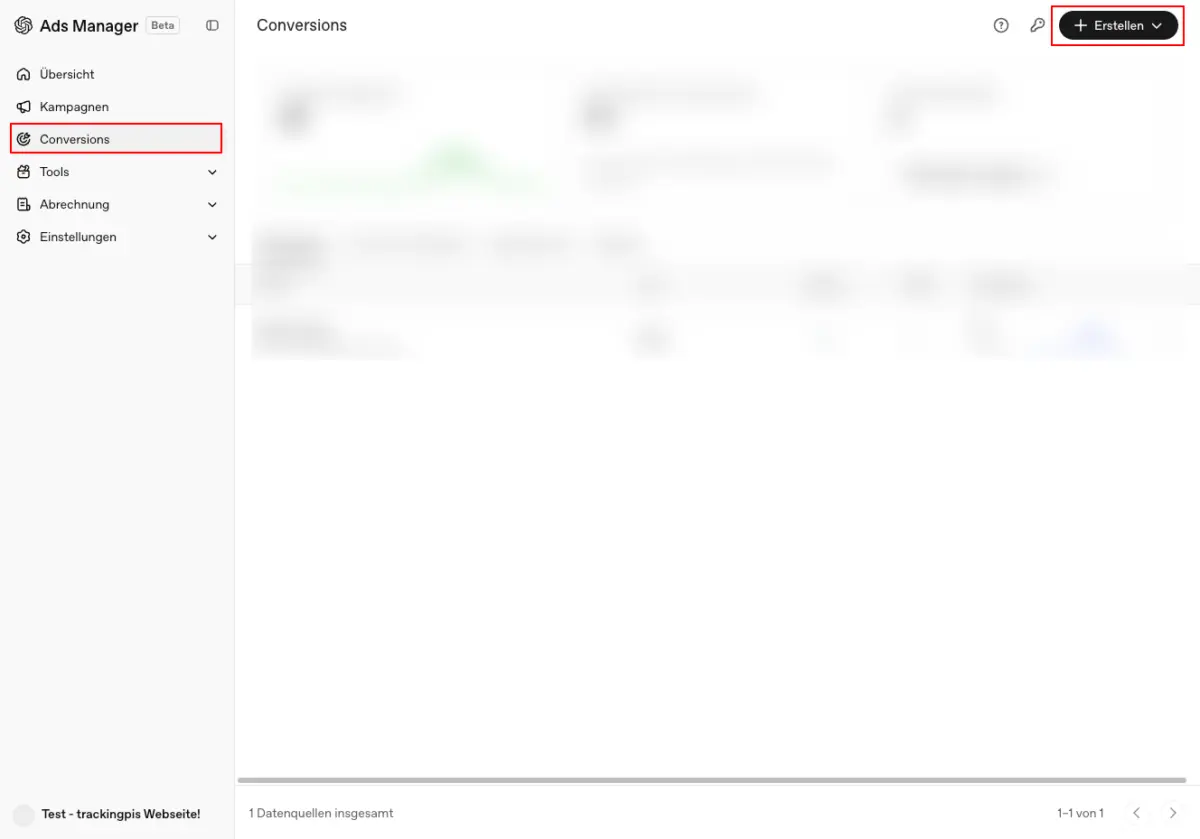
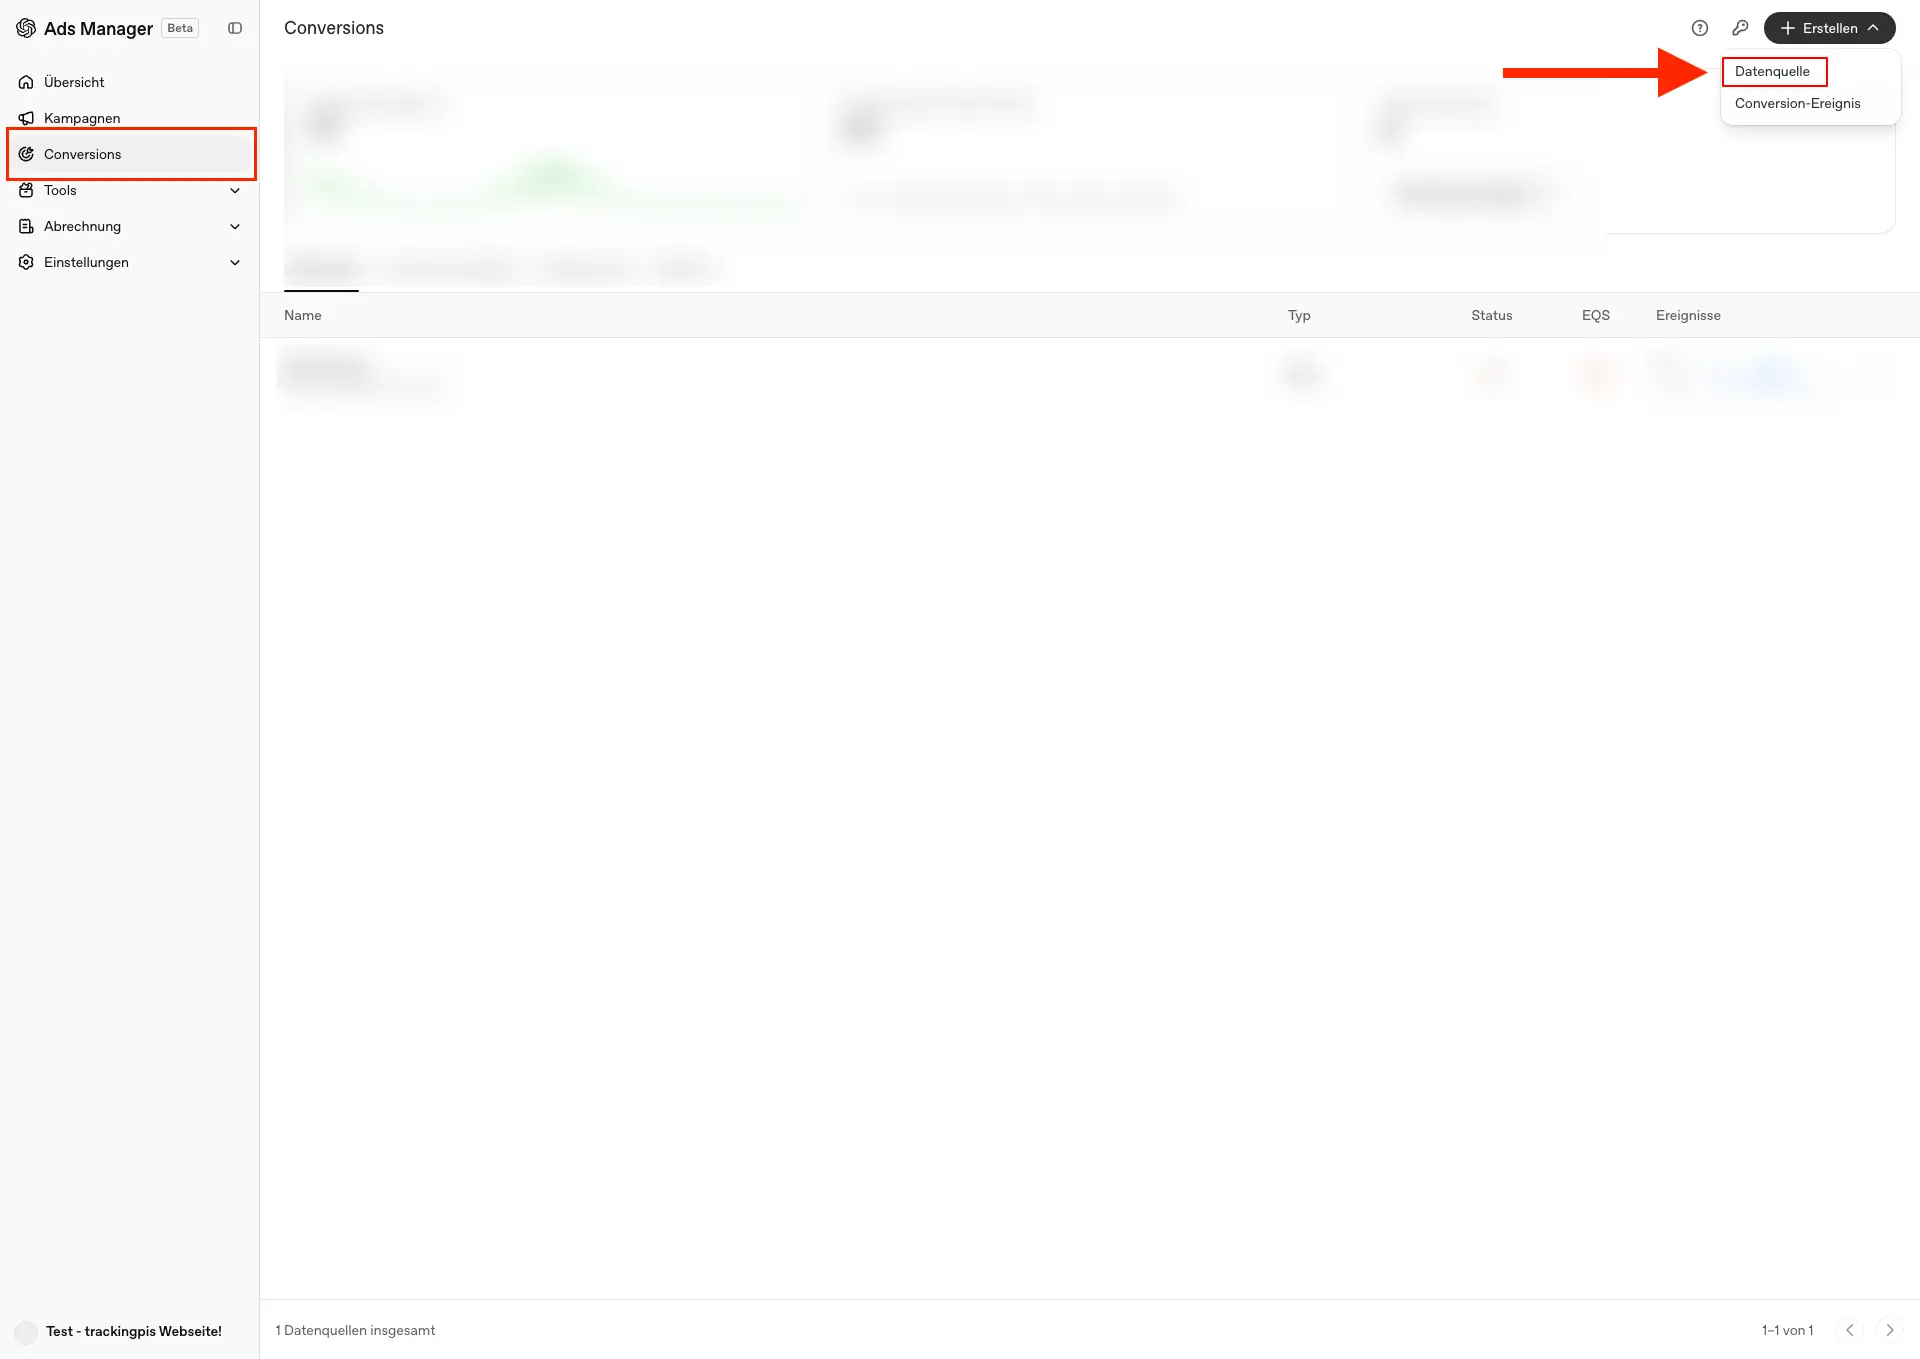
Under ” Conversions,” click ” Create ” in the upper-right corner and select ” Data Source” from the menu.
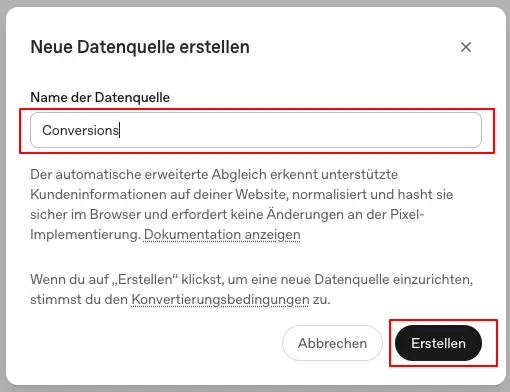
Enter a name for the data source, such as “Conversions” (you can choose any name you like). Then click Create.
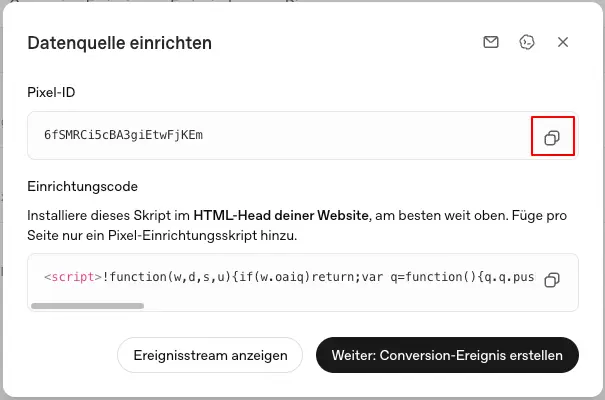
After creating it, the ” Set Up Data Source” dialog box will open. Use the copy icon to copy the pixel ID. You’ll need it in Step 3. You can find all pixel IDs at any time under ” Conversions.”
Step 2: Create a conversion key and an API key
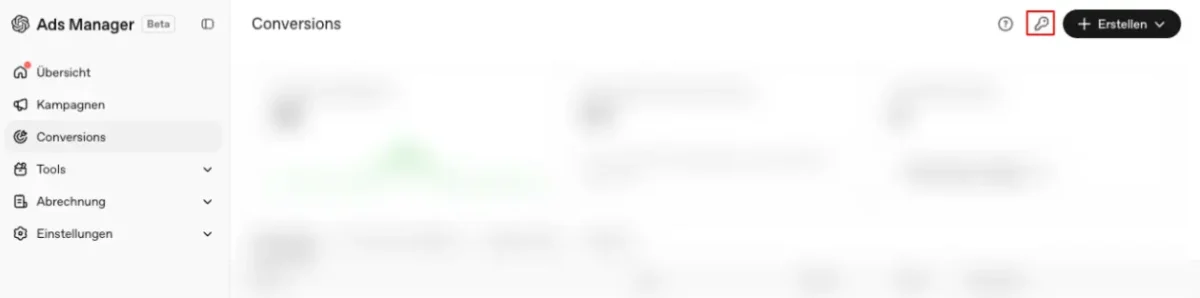
Under ” Conversions,” click the key icon in the upper-right corner next to “Create.” That’s where all conversion keys are managed.
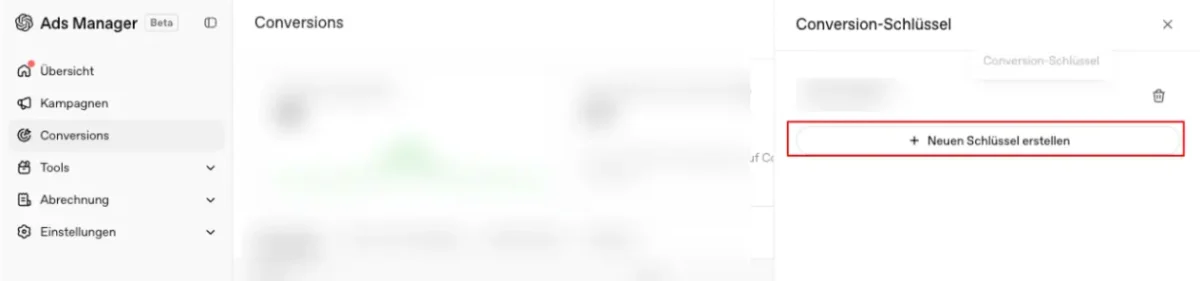
Click ” Create New Key.”
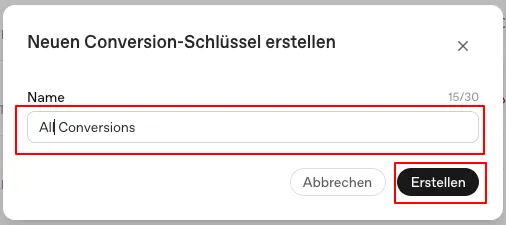
In the “Create New Conversion Key ” dialog box, enter a name such as “etracker” (max. 30 characters; you can choose any name) and click Create.
The ” Save Key ” dialog box displays the generated key. Click ” Copy” to copy it to the clipboard, or save it by clicking ” Download.”
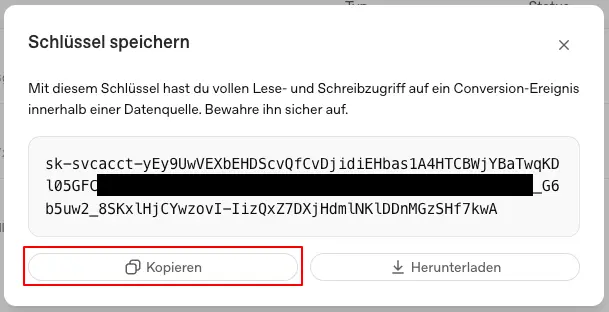
The conversion key is displayed only once. Copy it right away and keep it in a safe place. If you lose it, you’ll have to generate a new key.
You’ll also need an API key. This allows etracker to create conversion events in OpenAI Ads Manager. To do this, open Settings → General in the left-hand navigation menu.
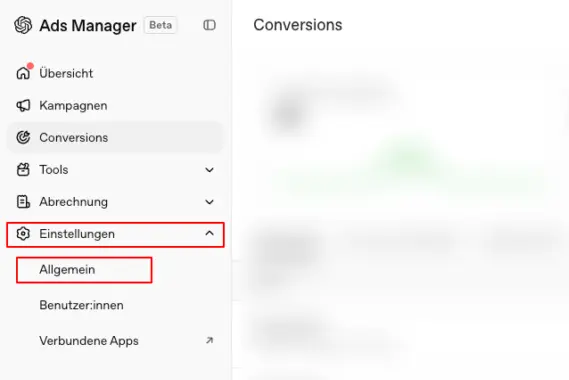
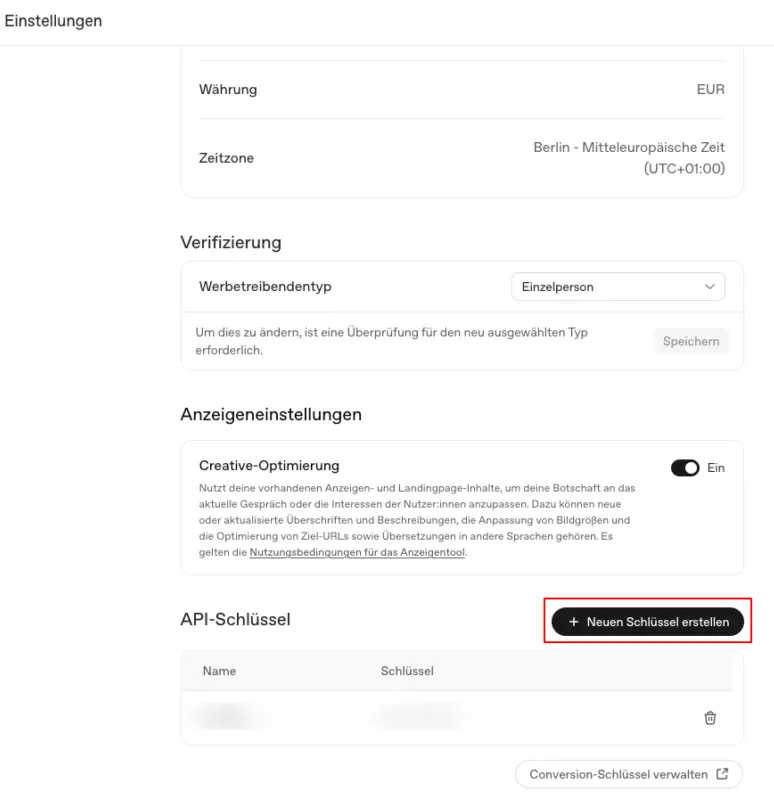
Scroll down to the ” API Keys ” section and click ” Create New Key.”
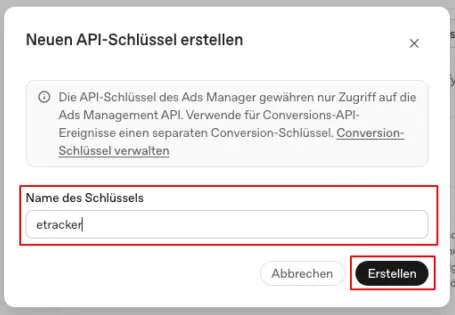
In the “Create New API Key ” dialog, enter a name such as “etracker” (you can choose any name) in the “Key Name ” field, and click ” Create.”
The ” Save Key ” dialog displays the generated API key. Click ” Copy” to copy it to the clipboard, or save it by clicking ” Download.”
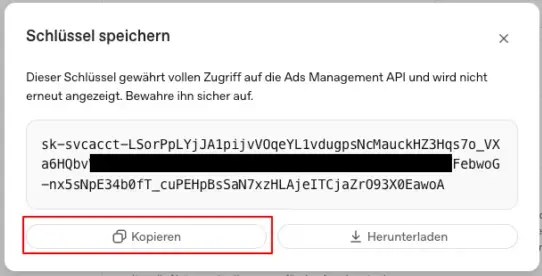
The API key is also displayed only once. Copy it right away and keep it in a safe place. If you lose it, you’ll have to generate a new key.
Step 3: Setting up the conversion upload in etracker analytics
Go to Configuration → Conversion Upload→ OpenAI Ads.
In the “Access Data ” section, enter the values from Steps 1 and 2 into the ” Pixel ID,” ” Conversion Key,” and ” API Key” fields, and then click ” Save.”
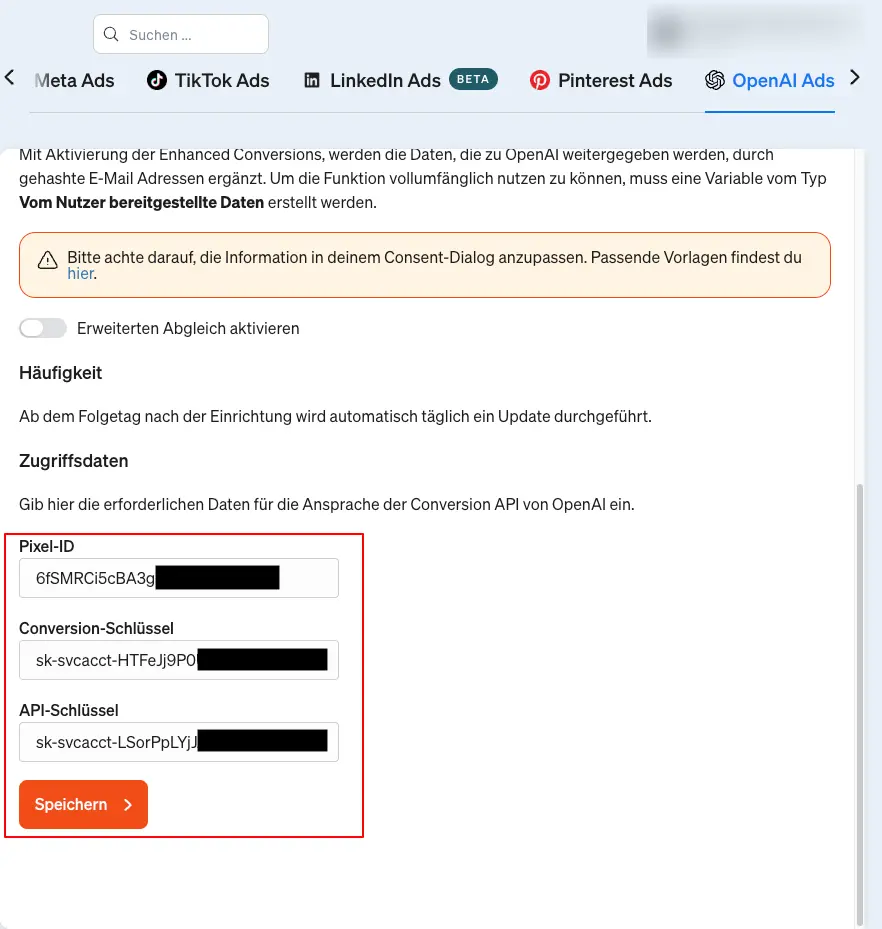
In the ” Conversion Selection ” section, you can see how your etracker conversions are transferred to OpenAI:
| etracker Conversion | OpenAI Event |
|---|---|
| Purchases | order_created |
| Leads | lead_created |
| All Other Conversions | custom (with the respective conversion name) |
Starting the day after setup, your conversion data will be automatically uploaded every hour (provided you’ve set up campaign tracking for your ads and conversions have been measured through OpenAI Ads).
etracker automatically creates the conversion events via the API in OpenAI Ads Manager during the first upload. You can then find them under Conversions → Conversion Events.
This completes the setup of the conversion upload.
OpenAI: Setting Up OpenAI Ads Campaign Tracking
In your etracker account, go to Configuration → Conversion Upload→ OpenAI Ads.
In the ” Tracking ” section, click the “Parameters” field to copy the displayed URL parameters:
etcc_med=Paid%20Search&etcc_par=OpenAI&etcc_cmp=KAMPAGNENNAME&etcc_ctv={ad_id}&etcc_grp={ad_group_id}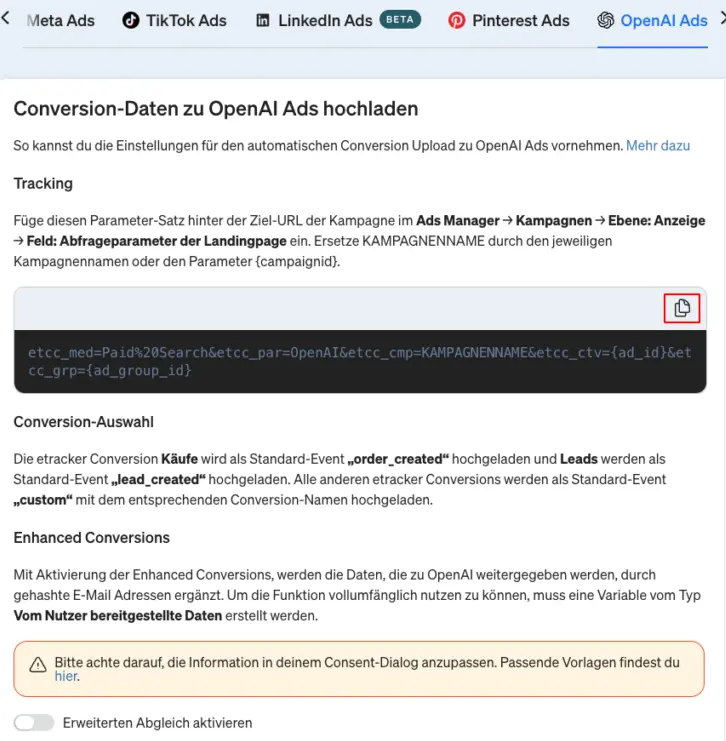
Enter this set of parameters in the OpenAI Ads Manager under ” Campaigns ” at the ad level in the “Tracking Parameters ” field for all active ads. Replace KAMPAGNENNAME with the respective campaign name or the parameter {campaign_id}.
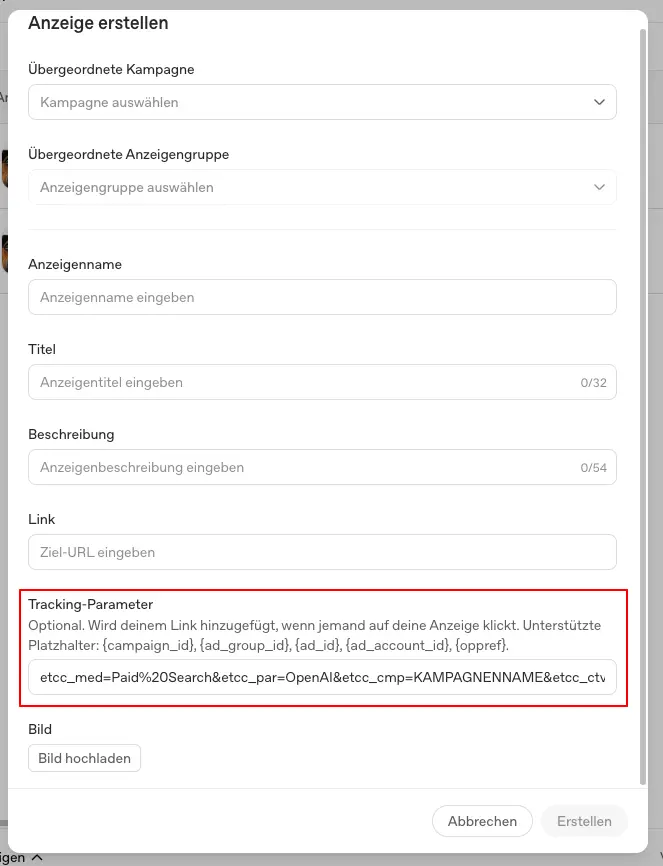
This ensures that all visits generated through OpenAI Ads are tracked in etracker analytics along with the corresponding campaign information, and conversions are attributed according to the attribution models.
etracker: Setting Up the OpenAI Conversion Tag
The combination of the OpenAI pixel and conversion uploads via etracker analytics requires that the OpenAI pixel be managed through the etracker tag manager.
This ensures that identical conversion actions are not counted twice but are deduplicated by OpenAI. etracker automatically generates unique conversion IDs for this purpose. OpenAI identifies duplicates based on the pixel ID, event name, and event ID.
To enable conversion deduplication, the OpenAI Conversion Tag must be enabled in the etracker tag manager
- are triggered on the same websites as the uploaded etracker conversion,
- use the same pixel ID and the same event as the upload (e.g., order_created for purchases) and
- contain the same value as the etracker conversion.
The process is illustrated below using the conversion purchase, which is recorded using the etracker store plugin or etracker e-commerce event.
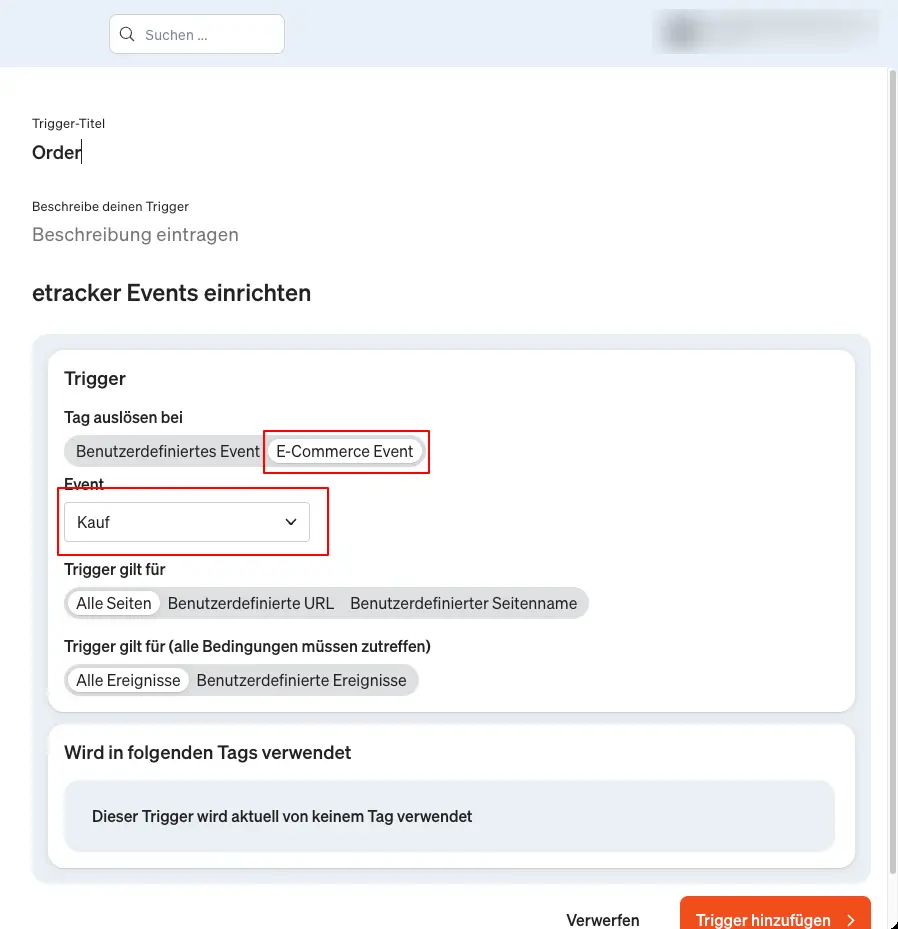
First, set up a trigger that fires when the etracker e-commerce event “Purchase ” occurs. To do this, go to etracker tag manager → My Triggers → Add Trigger → etracker Events. Select “E-commerce Event” and then “Purchase” from the dropdown menu.
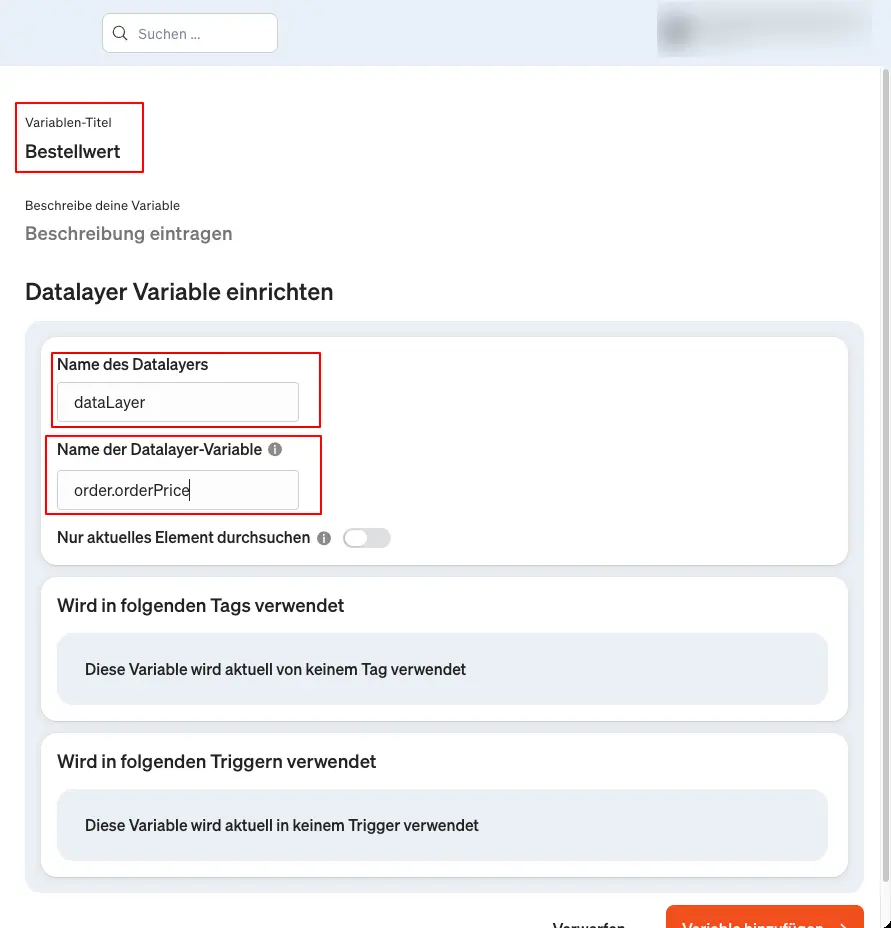
Next, create a variable for the order value. If you’re using one of the etracker Shop plugins or the E-Commerce API, all e-commerce events are pushed to the data layer. This allows you to pass the order value to the OpenAI tag.
To do this, go to Tag Manager → My Variables → Add Variable → Data Layer. Enter any variable title you like, such as “Order Value,” set the data layer name to “dataLayer,” and set the data layer variable name to “order.orderPrice.”
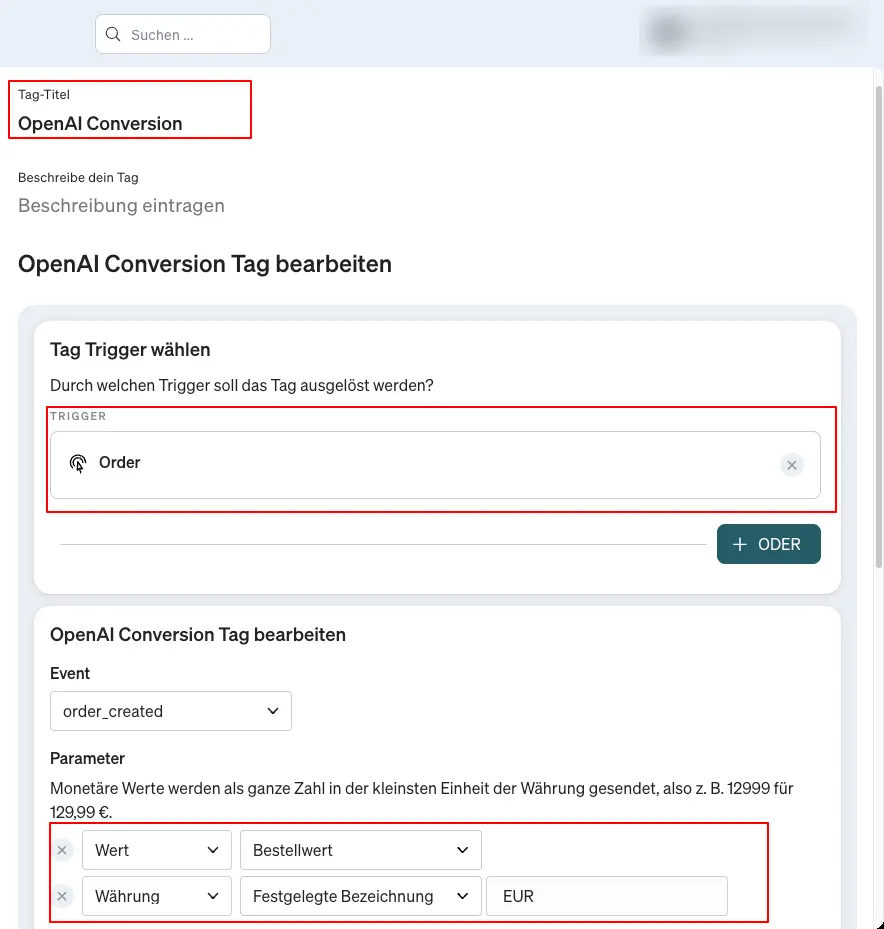
Finally, set up the OpenAI Conversion Tag using the variable and trigger you created earlier. To do this, go to Tag Manager → My Tags → Add Tag → OpenAI Tag → OpenAI Conversion Tag.
Enter a custom tag title, select the trigger you just created, and choose the appropriate event (in this case, `order_created`). Under “Parameter, ” select the variable “Order Value” for “Value” and adjust the currency if necessary (e.g. , “EUR”).
etracker automatically creates the appropriate conversion event (in this case, `order_created`) via the API during the conversion upload. The conversion upload and the tag use the same conversion event; you don’t need to do anything else in OpenAI Ads Manager.
Using debug mode, you can check the correct transmission on the order confirmation page when executing a test order.